-
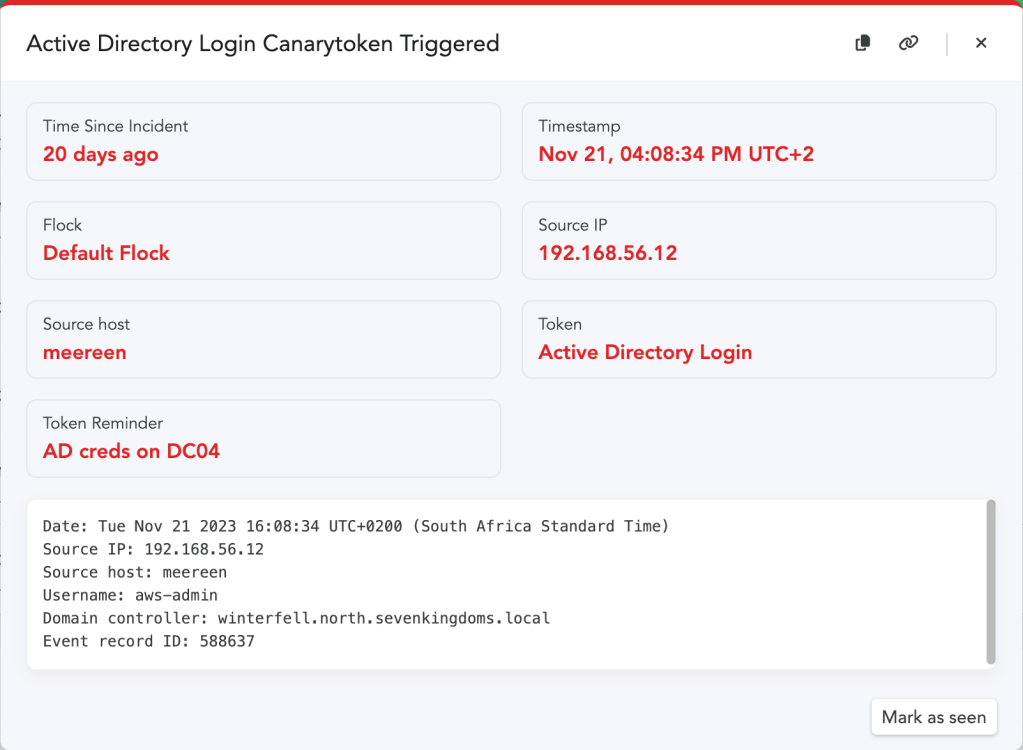
A (beta) Canarytoken for Active Directory Credentials
Attackers on your network love finding stray credentials. They are an easy way to elevate privileges and are often one of the first things attackers look for during post-exploitation.
There’s no shortage of places where these credentials can be found and surprisingly, there’s very little downside to attackers trying them…
…unless there’s a way to drop decoy credentials. This isn’t a new idea, but it usually requires heavy tooling and configuration.
Our newest AD tokens allow you to create fake credentials that can be left in all the familiar places, but without a heavy software component. A single, light-weight script that runs on your Domain Controller lets you know when the fake credentials are used.
Lets walk through typical usage:
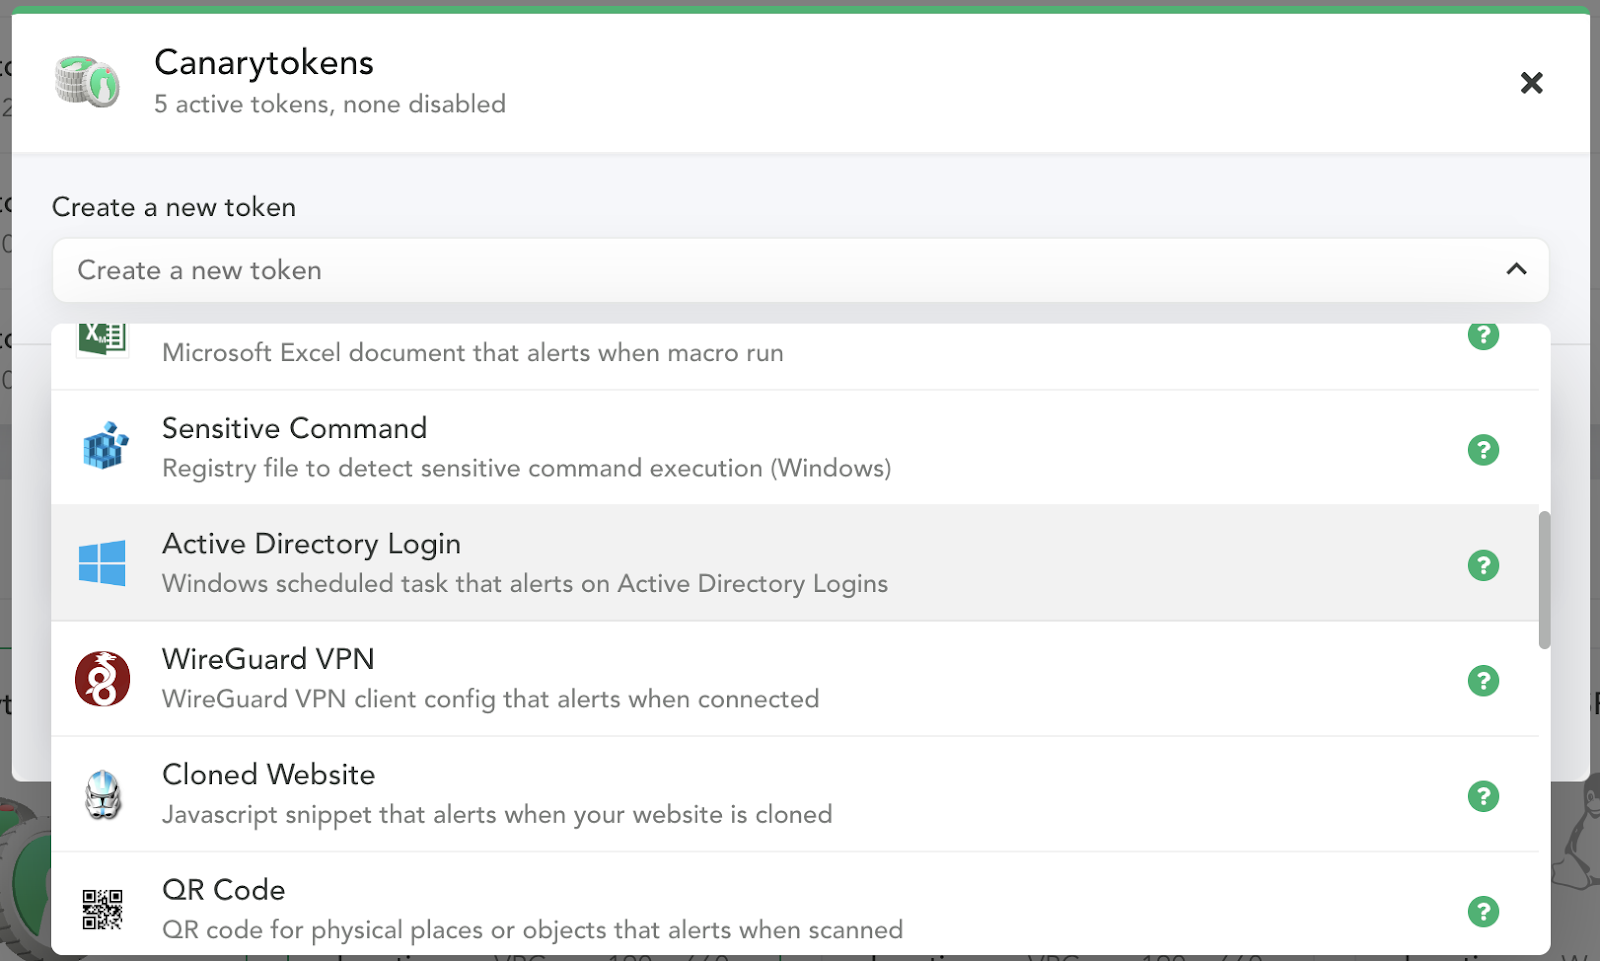
- Head over to your console to create a new “Active Directory Login” token:
- You’ll need to add:
- A Token reminder, which is a note to your future-self reminding you where you placed the fake credentials. It’s possible that this token will fire months from now, when you’ve forgotten where you deployed it. The token reminder could be something like: credentials left in unattend.xml files on the backup server.
- A few fake usernames which when used will trigger the token (we’ll suggest some randomized plausible candidates for you automatically).
- You can download these credentials as an unattend.xml file and/or as a plain text file to leave lying around.
- Then you can download the token itself. This script will create a task on your server that catches the planted credential (attempted) usage. Run this script on a Domain Controller to set up the task.
- An attacker who finds these credentials somewhere on your network will try them, which adds entries to event logs. The task processes the event logs and when it sees a login attempt for one of the fake credentials, it will fire off an alert to your Console (and announce their presence).
This is an unusual token for us, because it runs a script on your Domain Controller. We’ve kept the script simple and legible so that you can make sure it’s not doing anything nefarious (and so that the script logic can be easily extended). Our work on this token is inspired by IppSec, who showed an initial concept for an AD token that you can catch in his YouTube video here.
If you’d like to take it for a spin, reach out to us here. We’d love to hear how it works out!
-
Cloned Website Token and Reverse Proxies
Our Cloned Website Token has been available for a long time now, both on our public Canarytokens.org site as well as for our Canary customers. It’s helped users all over the world detect attacks early in the process. We wanted to take a moment and go over some of the details of this token: how it works, how to create and use one, and critically, how it fares against the new “Adversary-in-the-Middle” (AitM)-generation of phishing attacks..
The cloned website token is super simple: You get an alert any time your webpage is hosted or proxied through an unexpected location.
It’s free, it’s easy, and finding out your site has been cloned as soon as it happens gives defenders precious hours (or days) to get ahead of serious attacks.
Here is how you create it:
1) Visit canarytokens.org
2) Select cloned site token
3) Add this JS to your site
4) You can choose to obfuscate it if you want
Now.. if an attacker clones or proxies your site…
The JS runs.. If it is not on the right domain
You get an alert.

So, in essence. If the URL for a site that a user has visited, is not the same as the expected URL, you get an alert.
Many of our customers also obfuscate the JavaScript, to avoid attackers that replace strings in a cloned site or proxied site. For example, if you just leave the plain text domain string example.com, attackers can simply match and replace that inside of your page. By adding obfuscation, you can make it more difficult to find and replace your token. Below is an example of a recent addition to our customer console, that allows teams to simply click to obfuscate the JavaScript.
We’ve also recently added obfuscation to our canarytokens.org site as well!
That is the basics. Takes you just a few seconds to create and obfuscate the JS Snippet and insert it. Go ahead and create one and put it on a site today, don’t worry, I’ll wait! If you want to learn more, keep on reading.
History of the Cloned Website Token – How did we get here?
This token has more than proved its worth from huge tech companies discovering their red teamers weeks before the official engagement has begun to large media houses actively fighting nation-state attackers.
Recently though, attackers have been upping their games with a move to making use of reverse proxies instead.
This allows duped users to interact with the original site, making the attacks more believable. Attackers can steal both usernames and passwords, as well as web based session tokens while providing a seamless experience to the users being phished.
What is a reverse proxy phishing attack?
The reverse proxy has been rediscovered with new enthusiasm and tools. In essence this is very similar to running a tool like Fiddler or Burp, where you can control and inspect and modify all the requests and responses. The attacker runs a reverse proxy and sits in the middle of the user and the legitimate server, hence Adversary-in-the-Middle. The attackers will send phishing emails or links, and hope you click on the site, and login–then they have captured your credentials.
There are a number of tools on the market that allow you to perform these attacks. Some examples are Modlishka, Muraena and EvilGinx (see references below) . These tools grant an attacker or researcher or defender complete control over the HTTP[S] interactions.
The researcher Kuba Gretzky and others have also done a number of talks and published extensive tools and documentation on this topic.
A common pattern is to register a domain name that is similar to the target that you hope to phish.
So suppose you have a nice website canaryexample.com. An attacker may register 3xample.com and then proxy victims to canaryexample.com through the fake site.
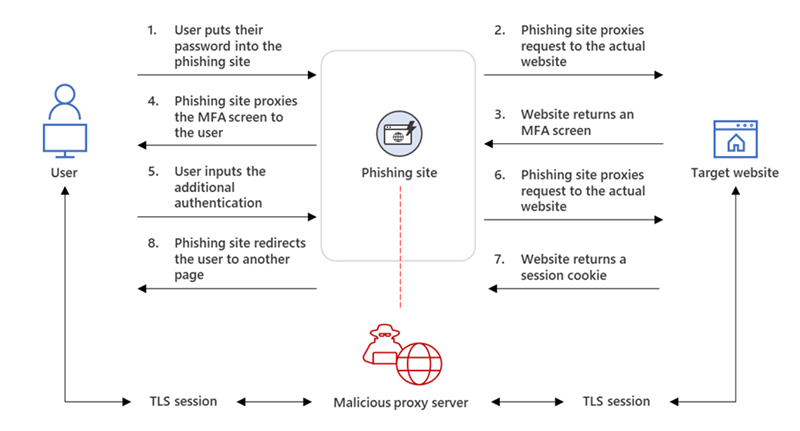
“The phishing page has two different Transport Layer Security (TLS) sessions—one with the target and another with the actual website the target wants to access. These sessions mean that the phishing page practically functions as an AiTM (Adversary in The Middle) agent, intercepting the whole authentication process and extracting valuable data from the HTTP requests such as passwords and, more importantly, session cookies. Once the attacker obtains the session cookie, they can inject it into their browser to skip the authentication process, even if the target’s MFA is enabled.” – Microsoft Threat Intelligence
What’s the difference with “basic” phishing attacks?
With basic phishing attacks, attackers attempt to recreate, or clone as faithfully as possible, a lookalike page (from Outlook, LinkedIn, Google, etc). They will then attempt to lure the victims into entering their credentials, which are then logged and stolen by the hacker.
A reverse proxy attack takes it one step further. Instead of showing a lookalike page, it simply relays traffic between the real website and the phished user.
After clicking on a malicious link, phished victims are sent to the real website, unaware that the malicious proxy is capturing the data being transmitted between the victim and the site. There are no TLS warnings, since the domain the user lands on initially is controlled and issued a valid certificate to the attacker.
This is an excellent diagram showing inspection and manipulation of HTTP body in the pages that are served:
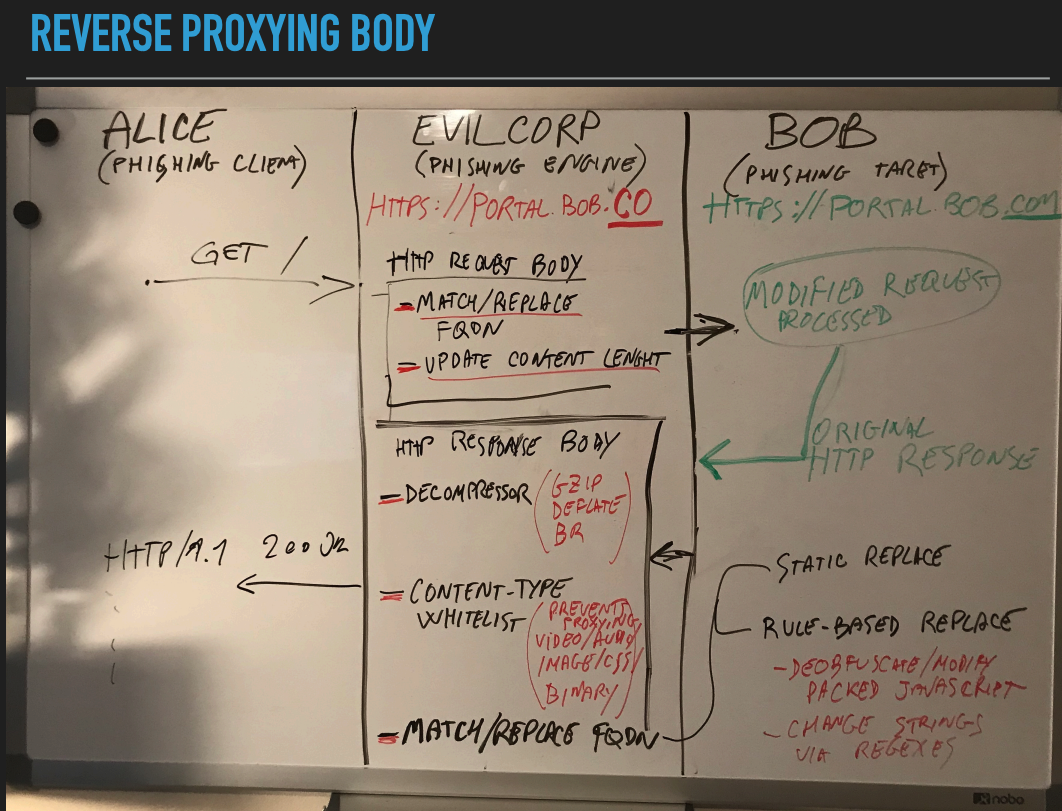
source: https://conference.hitb.org/hitbsecconf2019ams/materials/D2T1%20-%20Muraena%20-%20The%20Unexpected%20Phish%20-%20Michele%20Orru%20&%20Giuseppe%20Trotta.pdf How does the Cloned Website Token perform in the face of this new/old technique?
tl;dr: Even in the face of these emerging attacks, the cloned website token performs as expected!
This token is based on a very simple check: Expected vs Actual location of the website.
By distilling this token down to the essence of the check, it allows us to endure across a wide range of geriatric as well as emerging attacks. While the attacker’s techniques may change, this simple token still endures.
Let’s imagine our login site is canaryexample.com, however, the URL I clicked is associated with 3xample.com.
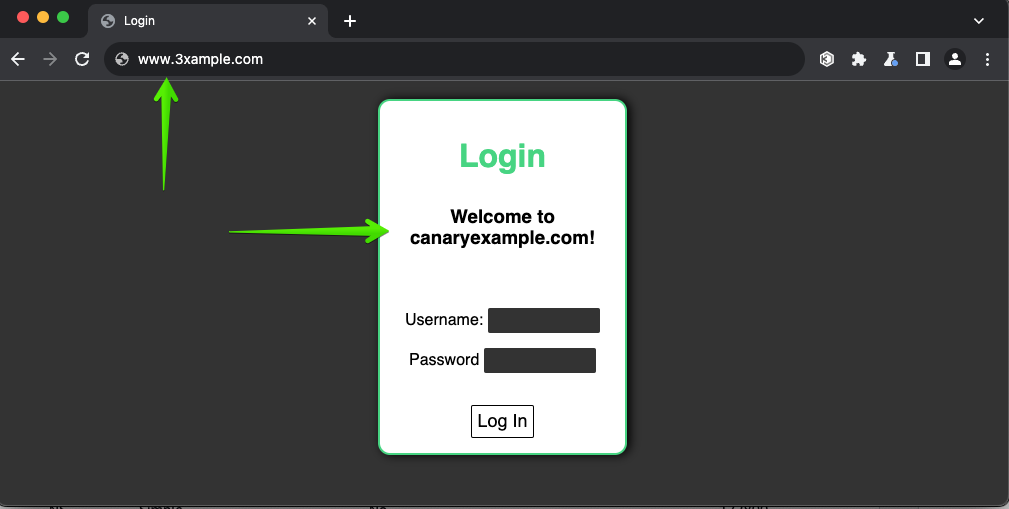
We can see the difference between the expected URL and the actual URL.
This is picked up by our Canarytoken and alerts us even before a user has even attempted to login to the fake / proxied site.
We think this is very exciting for teams defending their web apps.You can do this for free, you can do it today.
It’s a durable detection that works well in the face of emerging attacks.
A few more final thoughts
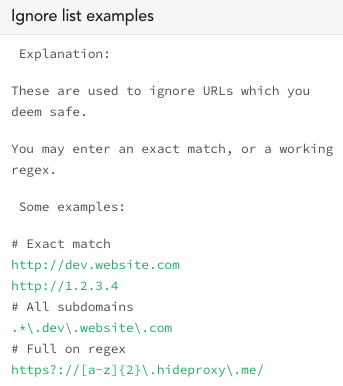
In our customer consoles we have an “ignore option” which is not available on canarytokens.org. The ignore list simply helps teams that have expected proxies or alternative hosting environments, or CDN, etc.. Even if you are using the open-source canarytokens.org, it’s important to think through possible expected domains that might trigger that don’t require an all-hands-on-deck response.
Proper Mitigation
While this may help you detect that your site has been cloned or is under an active proxy attempt, it is only a part of a holistic response to phishing campaigns. It is recommended to use FIDO2 as an MFA scheme as those authentication sessions are tied to the expected domain, so both simple cloning and AitM attacks will fail to get a session. Microsoft offers other guidance as well:
Closing thoughts
By adding a simple few lines of JavaScript, we can detect if a site we want to protect is being cloned or proxied. This gives defenders a quick insight that they may not otherwise have. Give it a try, it’s super easy, let us know how it goes. We are thankful for the authors of the reverse proxy tools for publishing their work and tooling to better help defenders with detection. It is important to realize, that without obfuscation, there is a chance your Cloned Website Token won’t alert, if the attacker is replacing strings–we’ve added obfuscation to help defenders.
Thanks for reading.
References
- https://blog.duszynski.eu/hijacking-browser-tls-traffic-through-client-domain-hooking/
- https://blog.duszynski.eu/phishing-ng-bypassing-2fa-with-modlishka/
- https://github.com/drk1wi/Modlishka
- https://github.com/muraenateam/muraena
- https://github.com/kgretzky/evilginx2
- How Much Is The Phish? Evolving Defences Against Evilginx Reverse Proxy Phishing by Kuba Gretzky
- Kuba Gretzky – Phishing Through Modern 2FA Defences With Evilginx
- https://github.com/CERT-Polska/anti-modlishka
- https://cert.pl/en/posts/2019/01/recommendations-on-mitigation-of-man-in-the-middle-phishing-attacks-evilginx2-modlishka/
- Phishing with Modlishka (bypass 2FA)
- https://www.microsoft.com/en-us/security/blog/2022/07/12/from-cookie-theft-to-bec-attackers-use-aitm-phishing-sites-as-entry-point-to-further-financial-fraud/
- https://github.com/aalex954/evilginx2-TTPs
- #HITB2019AMS D2T1 – Muraena: The Unexpected Phish – Michele Orru and Giuseppe Trotta
- Muraena – Unexpected Phish
- https://learn.microsoft.com/en-us/security/operations/token-theft-playbook
- https://www.proofpoint.com/us/blog/threat-insight/mfa-psa-oh-my
- https://catching-transparent-phish.github.io/catching_transparent_phish.pdf
-
CourtVision – Where’s my padel at?
Labs is the research arm of Thinkst but research has always been a key part of our company culture. All Thinksters are encouraged to work with Labs on longer term projects. These become that Thinkster’s “day job” for a while. (These are intended both for individual growth, and to stretch ourselves into new areas: They don’t have to be related to Canary or security).
I took a brief hiatus from the engineering team to explore a computer vision project: CourtVision.
CourtVision set out to explore how to process a video stream of a racquet and ball game (padel–popular in the southern hemisphere and growing in popularity world-wide!) from a stationary (but unaligned) camera and extract information about the game. Padel, like other racquet sports, is played on a regulation court with lines demarking in and out of bounds (though there are times when a ball is in play even outside of the court); CourtVision aimed to extract information such as player positions and ball trajectories from a video feed. Secondly, visualising these outputs to provide insights into game tactics and strategies.
While there are existing computer vision systems to track play in racquet games, namely the Hawk-Eye system, these require systems of multiple fixed, calibrated, and synchronised cameras. The CourtVision challenge was to offer similar outputs from a single viewpoint, that is not in a specific location in relation to the court
The problem formulation
The problem is thought of as unwinding the events that gave rise to the video. To achieve this we draw on prior knowledge such as court layout and ball and player dynamics. At each moment during a game the light emanating from the scene is sampled (at 30 fps) and produces a sequence of images.
The problem now is to associate certain pixels in the image with objects in the scene we would like to know more about and then make estimates about the objects positions that best explain the sensor readings – image sequence.
Starting from here a number of avenues were explored and below is a linearized path of how we went about solving this problem.
The path is simple (looking back):
- Establish a mapping from world coordinates to image plane pixel locations.
- Detect objects of interest (players and ball) in each frame.
- Estimate the world coordinates of each object by leveraging the inverse mapping found in Part 1.
Establishing a mapping between world coordinates and image plane is a well understood problem and implementations exist in commonly used computer vision libraries. The unknown in our case is doing it given a single image. Taking inspiration from [3], where they used the net on a tennis court to form an additional plane, we took orthogonal planes from the court structure and jointly found the camera pose and intrinsic matrices. This is explained in Part 1of the blog below.
In Part 2 we expand on how we leveraged existing computer vision models to detect objects of interest in each frame.
Previous works that attempted 3D tracking from a single camera relied on either: knowing the size of the object being tracked [1] and that its projected size is invariant to the viewing angle i.e spherical objects; or the object of interest followed purely ballistic trajectories [2]. Here, we modeled the ball trajectory as a ballistic trajectory but retained a multimodal distribution over the ball’s states in a particle filter allowing the tracker to quickly adapt to new trajectories (modes) without explicitly modeling the interaction with walls, floor and racket. Part 3 illustrates this approach.
We made the following assumptions:
- Camera is stationary (but does not need to be in a specific location)
- Court dimensions are known.
Players’ feet remain on the ground. Part 3 illustrates limitations in our tracker and by making this assumption we could improve player tracking stability.

Figure 1: The experimental setup showing a broadcast camera view (resized) and a schematic of a padel court dimensions in [mm]. Part 1: Camera calibration and pose estimation
Extracting real-world measurements from a camera requires knowing both the extrinsics (position and pose) and the intrinsics (such as focal length and distortion coefficients) of the camera. Once these are known we can map any point in the world coordinate frame to a pixel location in the image. We can also project rays into the world coordinate system from a desired pixel location.
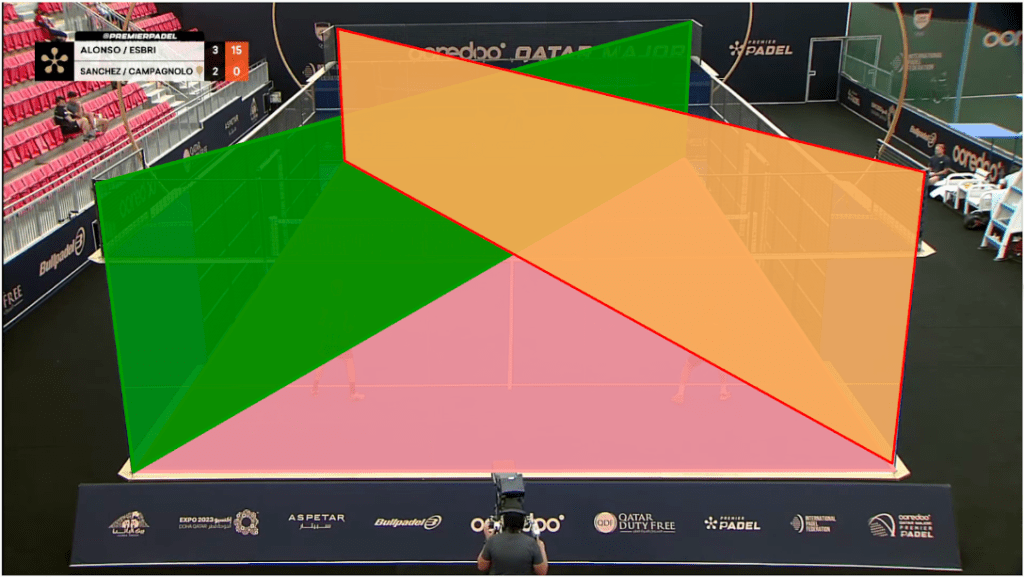
Figure 2: An annotated frame showing three of the eight planes used to perform single image calibration. The additional planes not visualised here are the side, front and back walls and a horizontal plane at the height of the glass. The trade off made for not having to collect data first hand is that little is known about the setup. In this case the camera intrinsics and extrinsics were unknown. The common approach to determine camera intrinsics is to capture a calibration sequence which is often a checkerboard pattern. Since we didn’t have such a luxury we exploited the structure in the scene and defined a set of planes for which the image plane and world coordinate correspondences could be identified. By doing this we effectively introduced a set of 8 planes (similar to a checkerboard) and performed camera calibrations from this. The mean reprojection error was approximately 9 pixels on 1080 x 1920 images.
Part 2: Bootstrapping custom object detectors
There are a plethora of off-the-shelf models that can do object detection however, none have single class “padel ball” detectors. Fine-tuning such a model is fairly common and to achieve this a few annotated frames were needed. LabelStudio is a very versatile data labeling tool that makes it easy to “put a model in the loop”. By doing this we bootstrapped our ball detector by repeatedly annotating more images and each time using the latest model to automatically label the additional images that were manually verified and corrected.
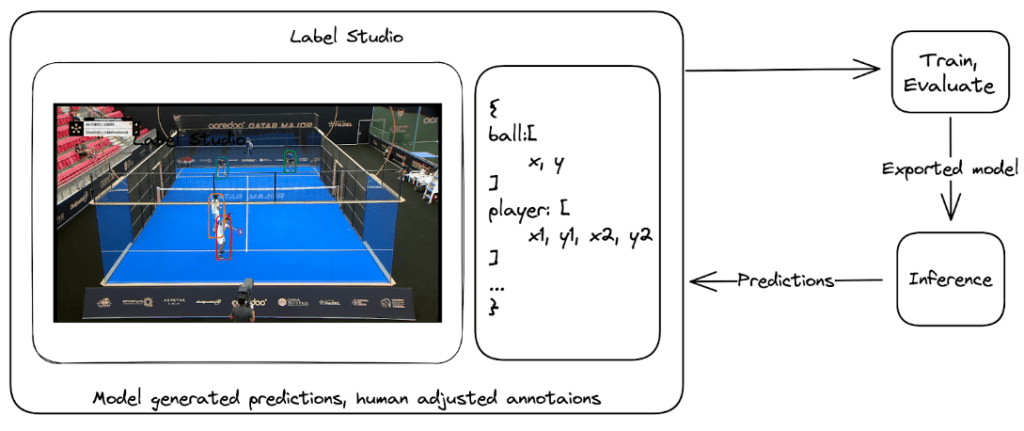
Figure 3: Cycle of labelling data, training a object detection model, manually labelling more data assisted by the latest model’s predictions and retaining. Part 3: Bringing image detections to the real world
Making detections on an image plane tells us nothing about the player and balls position in the real world. To estimate the position of the ball and players we define a state for each player and the ball and then update this state based on the detections. To govern this process in a more principled manner we used a Bayesian filter and in particular a particle filter.
A particle filter stores a distribution over the state of each object. This is stored as a vector and an associated weight indicating a probability mass. To illustrate this the top image in figure 4 shows the cloud of particles representing the state of the ball. During the filter’s update step we follow Bayes rule to update the weight of each particle based on how well they explain the observation (the image). As we can see the core of the particle cloud is around the ray emanating from the detected ball position in the image. All particles along that ray “explain” the observation equally well. The information held in that current state (prior) ensures the updated state does not naively squash all particles onto the ray. Bayesian filters like this are a great way to encode knowledge we have about the ball dynamics and current state and update this belief as we get more observations.

Figure 4: Top: showing the internal state of the ball tracker. Each particle representing an amount of “probability mass” over the position of the ball. Bottom: The yellow square is the ball detector’s output. The yellow dot is the weighted mean estimate of the ball position projected into the image plane. But we don’t want a fuzzy cloud around where the tracker “thinks” the ball is? We want to know the best estimate of the ball’s position. Once again we consult our probability distribution over our ball states. We can grab any statistic we want. The particle with the largest weight – argmax or the weighted mean over all states. Below is the weighted mean position of the ball.
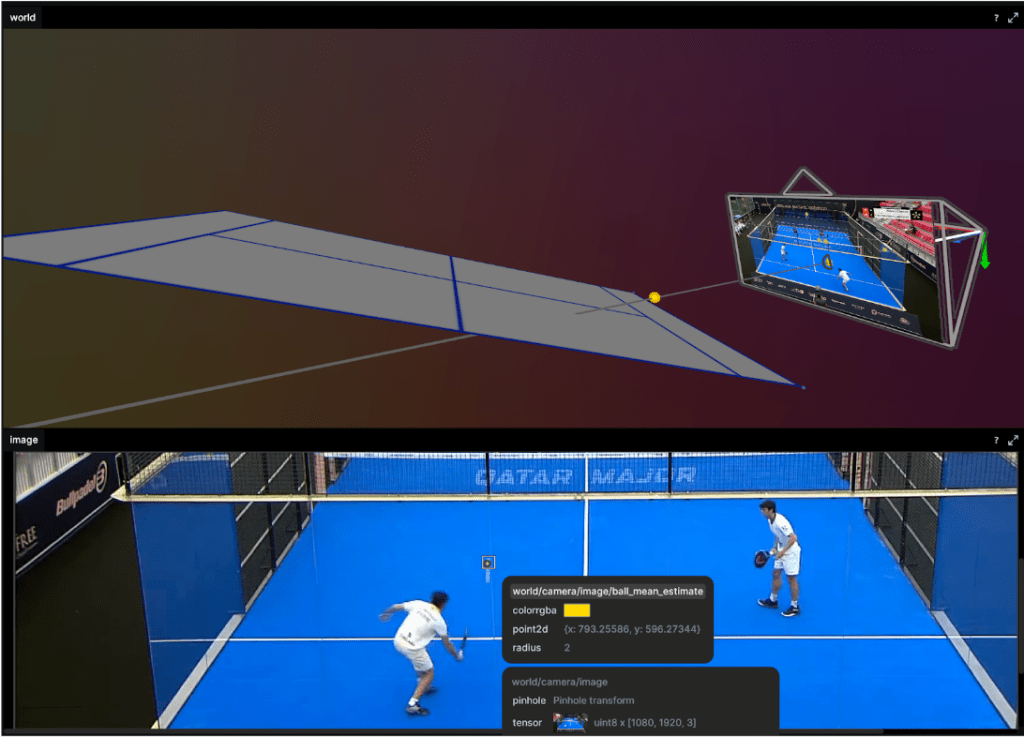
Figure 5: Top: Shows the weighted mean ball position. Bottom: The reprojected mean estimate of the ball in the image plane. This approach shows promising results but we did see the tracker fail after a few missed detection and resulted in mode collapse. That is the distribution over ball state (cloud of particles as in figure 6) either dispersed or reduced to a point. Particle filters come in a number of flavors and we only implemented the simplest resampling methods so it might be a bug in this or just a naive choice somewhere. Ah, research, so many avenues to explore!
To constrain the player tracking to a plane we called on assumption 3. from above and projected the ray to intersect with the ground plane. These results are shown below as a heatmap of player positions and velocity. Tracking under this constraint means a detected player (measurement) can be projected onto the ground plane (tracker state) with no information loss (3D to 2D) and our tracker remains performant.
Results
Figure 6: Top: heatmaps of position (left) and velocity (right) of the players. The team on the left side of the court is in the foreground in the bottom image. The ultimate goal of such a system is to provide insights into game play and strategies. To this end we show court occupation and player movement speeds. The position and velocity heatmaps of players during a rally. The bottom image has Team A in the foreground and Team B in the background. Here we can see where players were during the rally as well as how they moved. In this rally we can see Team A (on the left) plays from deep while Team B (on the right) occupies the mid court far more. Translating this raw positional information into actionable insights remains as future work.
Going from a set of hypotheses to evaluating them is a fun technical challenge and my time in Thinkst Labs was great. I still hope to bring this to a court sometime soon and test the final assumption: seeing game play metrics can improve tactics.
Resources
A collection of tools this project found useful as well as outputs from this work.
- Great computer vision libraries:
- An amazing visualization tool ReRun
- Slick tool for writing type set documents Typst
- Paper (pre-print) describing this work in detail
- Code associated with this project – CourtVision
References
[1] 3D Ball Localization From A Single Calibrated Image
[2] MonoTrack: Shuttle trajectory reconstruction from monocular badminton video
[3] Generic 3-D Modeling for Content Analysis of Court-Net Sports
-
Default behaviour sticks (And so do examples)
Introduction
We spend huge amounts of time sweating the details of our products. We want to remove all the friction we can from using them and want to make sure we never leave our users confused. To get this right, we do a bunch of things: we use simple language, we make extensive use of context-sensitive help and where it’s needed, we nudge users with illustrative examples.
Recently we bumped into something that made us rethink our use of examples.
Background
Paid Canary customers also receive a private Canarytokens server as part of their subscription. This is a private, managed version of the service publicly available at www.canarytokens.org. They get to mint an unlimited number of Canarytokens, get access to some tokens before they are released to the world and are able to trivially customise the service.
Canarytokens typically (but not always) rely on a DNS zone that’s unique per-customer. When a customer signs up, we create a DNS zone for them and usually that’s sufficient for their needs.
However, one of the advanced customisations for customers is the ability to create their own DNS zone with a name they pick. They’d typically do this to make the underlying hostname obviously tied to their company, so their custom DNS zone might look like
assets.their-company.com. This requires users to pick a zone name, and as a UX guide we autogenerated a name for them. We happily usedsomeprefix.their-company.com21, as an example: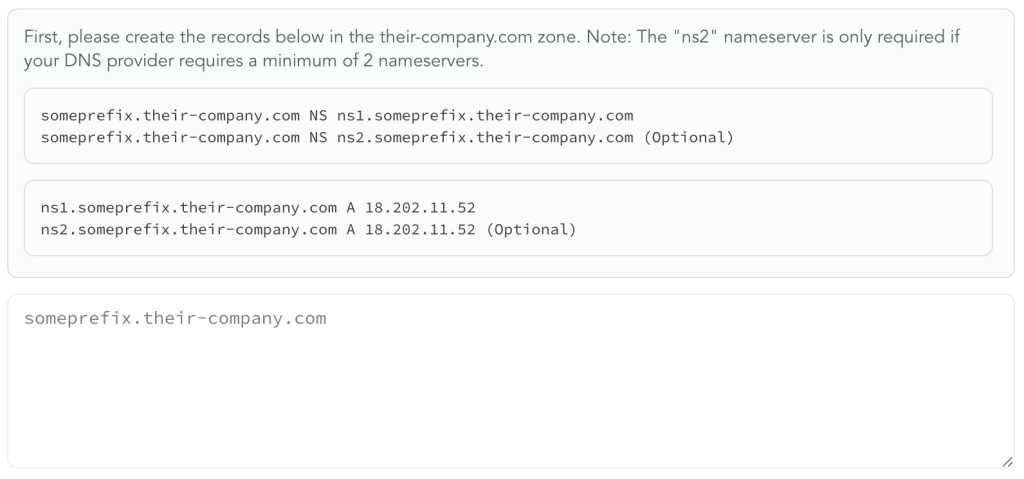
When we built the UI for this feature, the inclusion of the
someprefixexample was to make it easier for customer to configure DNS on their end, given that DNS can be tricky to get right. It wasn’t the intention that customer only use a zone calledsomeprefix, we simply picked it because we needed something to use in our examples. If the example zone name becomes an implicit standard then the risk is that it lets attackers more confidently guess about Canarytokens based on discovered hostnames.Recently, one of our engineers was working in this area of code and wondered how many customers simply followed the example shown and picked
someprefix.their-company.comas their custom domain of choice, as opposed to choosing another. His intuition was spot on. Among customers using this feature, ~40% used the example we provided: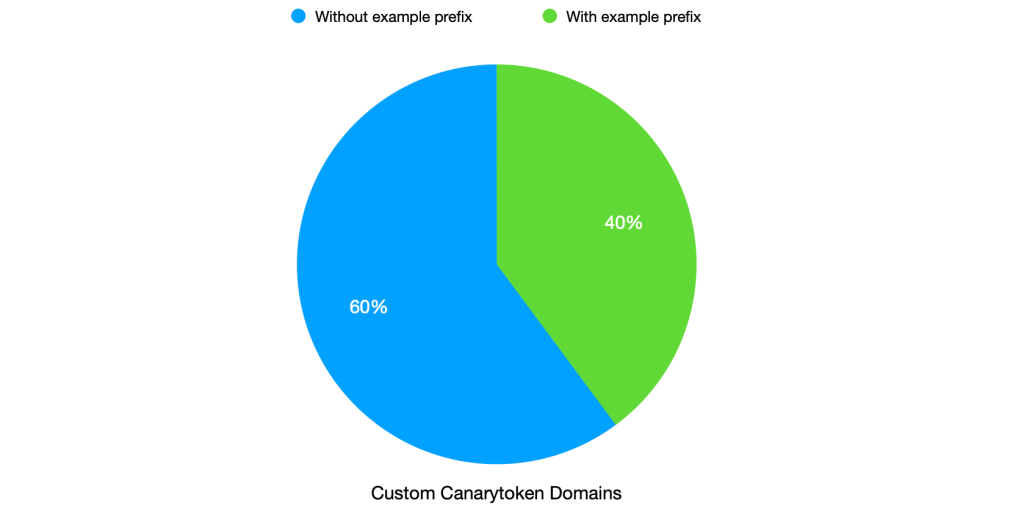
We use the custom domain to make Canarytokens less identifiable. If 40% of them use the same custom name, then the disguise is not as effective.
Learning
To be sure, this is not an individual customer problem. Looking at other configuration options present in our UI, the pattern is clear. When given an example, a significant number of users default to using that same example in their customisation. The behaviour is consistent across customers and configurations. This surprised us! 2
It’s important to realise this isn’t a customer-side issue; they shouldn’t have to consider the impact of every configuration option we choose to put in front of them. They don’t have the full context and knowledge, and expecting them to be experts in the nitty gritty of Canarytoken discoverability makes no sense. Frankly it’s a reason enterprise software is often so terrible; tons of options you barely understand or know about, and are configured according to tutorials/examples rather than understanding. This is a lesson for us internally about how we guide customers through using Canarytokens, and more generally through Canary.
Fortunately this particular case has a simple enough fix. Going forward, we will show multiple examples of prefixes. A user looking to add a custom domain will see a variety of example zones when they visit the page, and the examples will cycle each time they open the configuration page. We want to convey that they have options in choosing the name, and we show them a variety of sample options. Our hope is that this will prompt customers to pick their own names, and if they do rely on our examples then those are now spread over a large list of examples.
Conclusion
The outsized impact what seemed like a very minor placeholder choice made years ago helped us reevaluate how we select the examples we show customers. It’s a strong reminder about sweating every small detail in the UI; we were surprised at the oversized effect of our examples.
Going forward this particular placeholder has been altered and is already live for customers. We will report back with a count with the new active examples in the future.
-
Meet “ZipPy”, a fast AI LLM text detector
Introduction
Today we’re open-sourcing a research project from Labs, ZipPy, a very fast LLM text detection tool. Unless you’ve been living under a rock (without cellphone coverage), you’ve heard of how generative AI large language models (LLMs) are the “next big thing”. Hardly a day goes by without seeing a breathless article on how LLMs are either going to remake humanity, or bring upon its demise; this post is neither, while we think there are some neat applications for LLMs, we doubt it’s the end of work or humanity. LLMs do provide the ability to scale natural language tasks, for good or ill, it is when that force-multiplier is used for ill, or without attribution, that it becomes a concern already showing up, from disinformation campaigns, cheating in academic environments, or automating phishing; detecting LLM-generated text is an important tool in managing the downsides.
There are a few LLM text classifiers available, the open-source Roberta-base-openai-detector model, GPTZero, and OpenAI’s detector. All of these have shortcomings: they are also large models trained on large datasets, and the latter two are commercial offerings with little information on how they operate or perform. ZipPy is a fully open-source detector that can be embedded into any number of places, enabling detection “on the edge”.
TL:DR; ZipPy is a simple (< 200 LoC Python), open-source (MIT license), and fast (~50x faster than Roberta) LLM detection tool that can perform very well depending on the type of text. At its core, ZipPy uses LZMA compression ratios to measure the novelty/perplexity of input samples against a small (< 100KiB) corpus of AI-generated text—a corpus that can be easily tuned to a specific type of input classification (e.g., news stories, essays, poems, scientific writing, etc.).
We should note that no detection system is 100% accurate, ZipPy included, and it should not be used to make high-consequence determinations without corroborating data.
Background
Generative AI and LLMs
LLMs are statistical machine learning (ML) models with millions or billions of parameters, trained on many gigabytes or terabytes of training input. With the immense volume of input data, during the training phase the model aims to build a probability weighting for all tokens or words given the preceding context. For example, if you were to read the contents of the entire web, the sentence “The quick brown fox jumps over the lazy dog” would [relatively] frequently. Given the context “The quick brown”, the most probable next word is learned to be “fox”. LLMs have to be trained on large datasets in order to attain the “magical” level of text understanding, and this requirement leads to our detection strategy.
Intuitively, every person has a unique vocabulary, style, and voice—we each learned to communicate from different people, read different books, had different educations. An LLM by comparison has the most probable/average style, being trained on close to the entire internet. This nuance is how LLM classifiers work—text written by a specific human will be more unique than the LLM’s model average human writer. The detectors listed above work by either explicitly or implicitly (through training on both human and LLM datasets) trying to determine how unique a text is. There are two common metrics, Perplexity and Burstiness.
Perplexity is a measure of surprise encountered with reading a text. Imagine you had read the entire internet and knew the probability tables for each word given the preceding context. Given “The quick brown” as context, and the word “fox”, there would be a low perplexity as the chance of seeing “fox” come next is high. If the word was instead “slug”, that would have a large difference between expectations and reality, so the perplexity would increase. The challenge with calculating perplexity is that you have to have a model of all language in order to quantify the probability of the text. For this reason, the existing detectors use large models trained on either the same training data as is used to train the LLM generators, or datasets of both human and LLM generated texts.
Burstiness is a calculation of sentence lengths and how they change throughout a text. Again, an LLM will generally migrate towards the mean, so lengths will be closer to the average, with human-written text having more variance in sentence length. This is easier to calculate, but more impacted by the type of text: some poems have little to no punctuation, whereas others have a number of highly uniform stanzas; news briefs are commonly punchier; and academic papers (and blogs about burstiness) can have extremely long sentences.
Both of these metrics are impacted by the temperature parameter used by an LLM to determine how much randomness to include in generation. Higher temperatures will be more perplexity and bursty, but run the risk of being more non-sensical to a human reader. If a human author is writing a summary of a local slug race, captioning a picture: “The quick brown slug, Sluggy (left), took home the gold last Thursday” would make sense. LLMs don’t understand the world or what they are writing, so if the temperature were set high enough that it would output: “The quick brown slug”, the rest of the text would likely be nonsensical.
Compression
Compression is the act of taking data and making it smaller, with a matched decompression function that returns the compressed data to [close to] the original input. Lossless compression (e.g., .ZIP files) ensures that the data post compression and decompression is the same as the original input; lossy compression (e.g., .JPG or .MP3 files) may make minor adjustments for better compression ratios. Compression ratios are a measure of how much smaller the compressed data is than the original input. For the remainder of this blog post we’ll just be discussing lossless compression.
Compression generally works by finding commonly repeated sequences and building a lookup table or dictionary. A file consisting of all one character would compress very highly, whereas truly random data would compress more poorly. Each compression algorithm may have different scheme for choosing which sequences to add to the table, and how to efficiently store that table, but generally they work on the same principles.
Compression was used in the past as a simple anomaly detection system: by feeding network event logs to a compression algorithm and measuring the resultant compression ratio, the novelty (or anomaly) of the input could be determined. If the input changes drastically, the compression ratio will decrease, alerting to anomalies, whereas more of the same background event traffic will compress well having already been included in the dictionary.
Implementation
ZipPy is a research tool that uses compression to estimate the perplexity of an input. With this estimation, it is possible to classify a text’s source in a very efficient manner. Similar to the network event anomaly model, ZipPy looks for anomalies in the input when compared to a [relatively] large initial input of AI-generated text. If the compression ratio improves when the sample is compressed, the perplexity is low as there are existing dictionary entries for much of the sample, whereas a high-perplexity input would reduce the ratio.
ZipPy starts with a body of text, all generated by LLMs (GPT, ChatGPT, Bard, and Bing) and compresses it with the LZMA compression algorithm (the same as in .ZIP files), calculating the
ratio = compressed_size / original_size. The input sample is then appended to the LLM-generated corpus and compressed again with the new ratio computed the same way. If the corpus compresses worse than with the sample, then the sample is likely to be LLM-generated; if the compression ratio decreases, then the sample is more perplexity, and is more likely human-generated.At its core, that’s it! However, as part of our research, there are a number of questions we’ve been exploring:
- How does the compression algorithm change the performance?
- What about compression presets (which improve compression but are slower)
- What is the optimal size and makeup of the initial body of AI-generated text?
- Should the samples be split into smaller pieces?
- Is there a minimum length of sample that can impact the overall ratio enough to get good data?
- How should formatting be handled? An early test on a human sample failed because each line was indented with 8 spaces (which compressed well).
We don’t have all the answers yet, but our initial findings are promising!
Evaluation
In order to test how well ZipPy performs, we needed datasets of both human and LLM text. In addition to using ChatGPT, Bard, and Bing to generate about ~100 new samples to test, we explored the following datasets:
OpenAI’s GPT-2 dataset (
webtextandxl-1542M)MASC 500k (excluding the email and twitter collections)
GPT-2-generated academic abstracts
News articles re-written by ChatGPT
CHEAT (ChatGPT-generated academic abstracts)
ZipPy performs best on datasets that are English (due to all of the AI-generated “training” text being English-language) and that are written as sensical prose. Two of the datasets we evaluated, GPT-2 and GPT-3 output were created without prompts to guide the output. ZipPy performs poorly on these, as the output is either poor (difficult to understand as a human) and/or extremely diverse (multiple languages, code, and odd formatting). A few examples from these datasets are provided below to provide a sense of the data that is difficult to classify for ZipPy:
layout_container:Genotion 2 – HD select
Focus: Batsu
Most more much HD contains information about is one of the best addon…read more Posts: 7
Check out more from Christina at: stock666.com Posted by:| September 03, 2018 06:36 AM design3D 2-3-3-3 … Posted by:| September 03, 2018 06:05 AM hiszog 2-3-3-3 … Posted by:| September 03, 2018 05:27 AM too amateur. At boot it says DLL missing. Posted by:| September 03, 2018 04:12 AM likes2eat 4-3-3-3 Early Review andenjoy! Posted by:| September 03, 2018 05:54 AM AutoVR 2-3-3-3 Built Dutch : O Posted by:| September 03, 2018 05:30 AM looks like it will get more popular : o Posted by:| September 03, 2018 02:10 AM Cross Fitness 3.0 Part 1 by CrossFit up
OpenAI GPT-2 sample #1Convocainftvalerie 20
13.9” L Y
1107g
With Screen Case
Material: Acetate
Auction Location:
10360 W. San Ramon Fairgrounds, Sonoma, California, 94950, United States
Taxes: TAXES MAY APPLY
Buyer’s Premiums: From (Incl.) To (Excl.) Premium 0.00 Infinite 20%
Shipping Details:
There if be 3 Methods to Buy from the Big T: (1) eTailer, Ebay or other Auction Sites, or (2) Ebay (convention). This Year Auction Will be Conducted on Ebay.com
OpenAI GPT-2 sample #21 2 3 4 5 6 7 8 9 10 11 12 13 14 15 16 17 18 19 20 21 22 23 24 25 26 27 28 29 30 31 32 33 34 35 36 37 38 39 40 41 42 43 44 45 46 47 48 49 50 51 52 53 54 55 56 57 58 59 60 61 62 63 64 65 66 67 68 69 70 71 72 73 74 75 76 77 78 79 80 81 82 83 84 85 86 87 88 89 90 91 92 93 94 95 96 97 98 99 100 101 102 103 104 105 106 107 108 109 110 111 112 113 114 115 116 117 118 119 120 121 122 123 124 125 126 127 128 129 130 131 132 133 134 135 136 137 138 139 140 141 142 143 144 145 146 147 148 149 150 151 152 153 154 155 156 157 158 159 160 161 162 163 164 165 166 167 168 169 170 171 172 173 174 175 176 177 178 179 180 181 182 183 184 185 186 187 188 189 190 191 192 193 194 195 196 197 198 199 200 201 202 203 204 205 206 207 208 209 210 211 212 213 214 215 216 217 218 219 220 221 222 223 224 225 226 227 228 229 230 231 232 233 234 235 236 237 238 239 240 241 242 243 244 245 246 247 248 249 250 251 252 253 254 255 256 257 258 259 260 261 262 263 264 265 266 267 268 269 270 271 272 273 274 275 276 277 278 279 280 281 282 283 284 285 286 287 288 289 290 291 292 293 294 295 296 297 298 299 300 301 302 303 304 305 306 307 308 309 310 311 312 313 314 315 316 317 318 319 320 321 322 323 324 325 326 327 328 329 330 331 332 333 334 335 336 337 338 339 340 341 342 343 344 345 346 347 348 349 350 351 352 353 354 355 356 357 358 359 360 361 362 363 364 365 366 367 368 369 370 371 372 373 374 375 376 377 378 379 380 381 382 383 384 385 386 387 388 389 390 391 392 393 394 395 396 397 398 399…1280
OpenAI GPT-3 sample #1Někdy mi začne zazvonit v telefonu život, protože to vůbec není telefon, ale sekundární vlna, kterou jsem přivolala k sobě.
Dnes mi to začalo zazvonit už po desáté, mám ráda pravidelnost, abych se v ní vyznala, a začala se pohybovat rychleji.
Ne, nemůžete se najít v mém životě, ale nemusíte také.
Protože se mi začne zazvonit, pořád stejně krásně, v okamžiku, když to přijde.
A je to pro vás taky tak nějak to pravé.
-Nekončí se už zase?- zaslechla jsem vyslovené základní já, a snažila jsem se mu na to odpovědět.
Nemáte moc důvodů mě zastrašovat, nebo mi přerušovat. Vy jste větší zvíře. Můžete si mě zavolat, když vám bude zase chybět něco vážnějšího. Nechcete to zas vyhodit, jako každého docela rozumného a slušného kluka, nebo jak jejich říkáte.
Komentáře
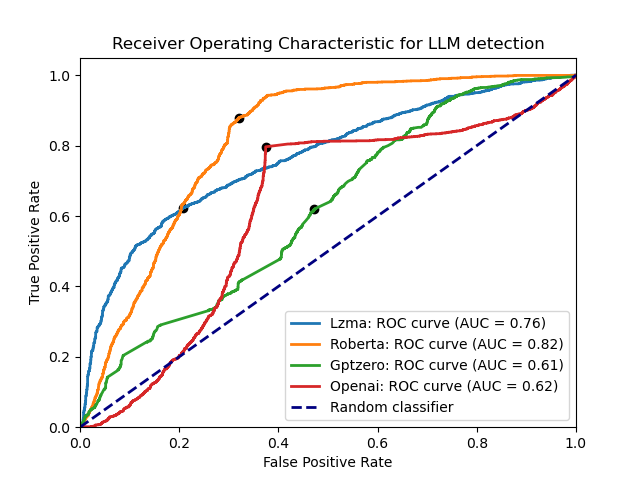
OpenAI GPT-3 sample #2With a subset of at most 500 samples per included dataset, we run just under 5000 documents through ZipPy (2m14s), OpenAI’s detector (29m22s), Roberta (1h36m17s), and GPTZero (1h1m39s). From this data, we construct a ROC curve for each. ROC curves show both the accuracy (area under the curve, or AUC) as well as the sensitivity at different decision thresholds. All the detectors provide a confidence score that a sample is either AI or human-generated, if the threshold for the decision boundary is adjusted, the detector may detect more true positives, but at the expense of more false positive detections.
If the un-prompted datasets are excluded, the performance of the detectors gives the following ROC curve, with LZMA being the curve for ZipPy:

ROC curve excluding un-prompted GPT-2 and GPT-3 output In simple terms, this curve shows that ZipPy correctly classifies the origin of an input 82% of the time, whereas Roberta has 80% accuracy, and both GPTZero and OpenAI sit at only 62% accurate. Adding the GPT-3 samples back in (without adding any new samples to the “training” file), the performance drops for ZipPy, and slightly improves for Roberta, which was trained on GPT datasets:
ROC curve excluding only un-prompted GPT-2 This shows that ZipPy’s compression-based approach can be accurate, but is much more sensitive to the type of input than Roberta. As ZipPy is more of an anomaly detector than a trained model, it cannot differentiate between novel types of input as well as the larger models. It does appear able to handle different types of data that have been added to the training file, the same data is used for news, essays, abstracts, forum posts, etc. but not completely differently formatted texts or those not in the same language as the training data. Additionally, due to the simple implementation, it is comparably easy to customize ZipPy for a specific set of inputs: simply replace the training file with LLM-generated inputs those that more closely the type of data to be detected.
It is interesting to see how poor the performance is from both OpenAI’s and GPTZero’s detectors, they are the commercial, closed-source options. That OpenAI’s detector should perform so poorly on datasets that presumably they would have easy access to is curious, hopefully as they improve their models their performance will catch up with the open-source Roberta model.
Conclusion
In conclusion, we think that ZipPy can add utility to workflows handling data of unknown origin. Due to its size, speed, and tunability, it can be embedded into a host of places where a 1.5B parameter model (Roberta) couldn’t. In the GitHub repository is: a Python 3 implementation of ZipPy, a Nim implementation that compiles to both a binary and a web-based detector, all of the data tested on, and harnesses for testing ZipPy and the other detectors.
As a cute example of how this could be used, we also include a browser extension that uses ZipPy in a web worker to set the opacity of web text to the confidence it is human-written. While there is too much diversity to the style of text in an average day’s browsing session, it demonstrates a proof-of-concept for filtering out the LLM-generated noise.
We are still actively exploring this idea, and would love feedback or thoughts. If you’d like to collaborate with us, or have something you’d like to share, please reach out to research@thinkst.com.
- How does the compression algorithm change the performance?
-
Birds at (Tail)scale
This week we are super excited to release the latest addition to our lineup of Thinkst Canary platforms: Tailscale.
Background
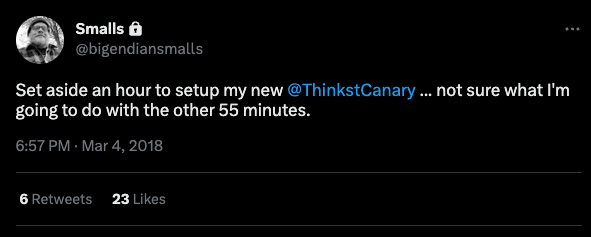
We’ve always made sure that deploying Canaries is absurdly quick and painless. It’s why you can add a hardware Canary to your network just by plugging it in and why most customers end up re-thinking their detection roadmaps:
https://twitter.com/bigendiansmalls/status/970342360923033601
We adore Tailscale: They have a first-rate team and their product is also widely loved for being startlingly simple to deploy. For this reason alone, we needed to consider a Tailscale Canary. But first, what is Tailscale?
Tailscale
Tailscale is a mesh VPN to run your own secure network. Think: I want all my endpoints to talk to each other on a secure network wherever they are in the world without worrying about eavesdropping. (They happen to do this with amazingly little configuration, across enough platforms to make your head spin). Like Canary, “it just works”.
(Really) Why a Tailscale Canary?
As Tailscale grows (and we think it will) you will see logical networks being setup and used regardless of the configuration (or location) of the physical networks beneath them. The Tailscale admin gets to create policies that allow a developer-machine access to staging, or to prod through simple Tailscale routing rules.
What will attacker lateral movement look like in a world like that?
An attacker who compromises user-A effectively becomes user-A, and views the world from their perspective. (As always) They are able to pivot to machines on user-A’s local network, but they also have access to hosts on user-A’s Tailnet. This is where Canaries shine. Attackers probing for other hosts on the Tailnet deserve to bump into Canaries as much as attackers exploring your cloud environments do. If only we can make deployment quick and painless.
Ed: they totally can.
Deploying a Canary into your Tailnet is (unsurprisingly) shockingly easy.
Head over to your Console and select the [+] icon to add a Canary. Then head over to the “Tailscale (beta)” block and select “Add Tailscale Canary”.
Enter an ephemeral Tailscale auth key and hit Launch. That’s it!
A Canary boots and is added to your Console (and your Tailnet).
You can configure the Canary just like any of its cousins (and you can use your Tailscale config to make sure the Canary never sends traffic to other hosts on your Tailnet for added security).
In the background we spin up an AWS environment per customer, drop a Canary into it and the bird joins your Tailnet. The AWS environment consists of a VPC and a private subnet in which the Canary lives. The Tailscale auth key is a single use tagged key such that the Canary joins with predefined ACLs that you control.
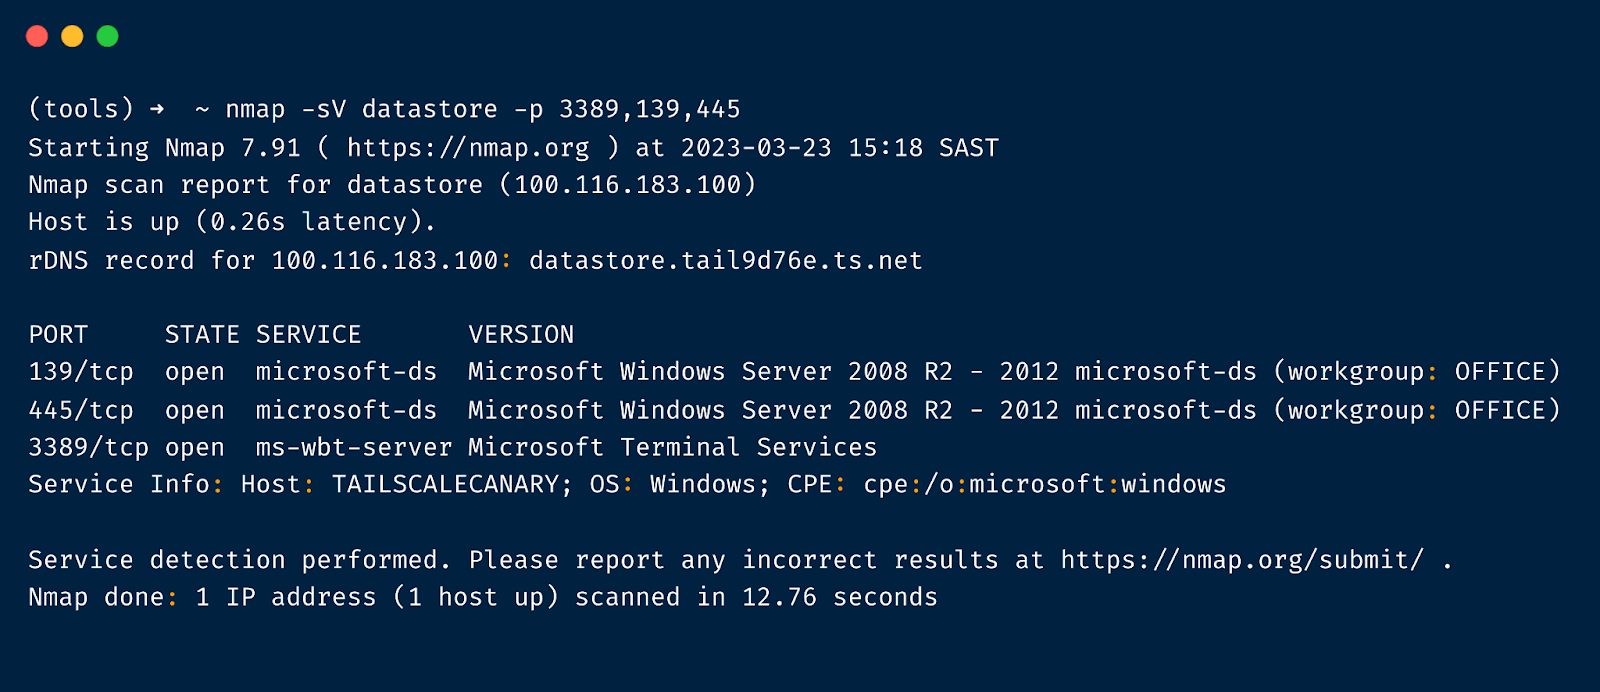
What this gives you is a Canary in your inner circle. Here we configured the Canary called DataStore with a Windows file share and RDP. Nmap-ing shows it as Windows machine with the corresponding service ports open.
Mounting the file share places a Canary right in the path of any attacker.
No matter where you work from, a Canary will be nearby to alert you to any undesired activity. For a total of 3 clicks and 4 minutes you will know when it matters. For more details head over to our knowledge base article.
-
Canarytokens.org welcomes Azure Login Certificate Token
Introduction
The AWS API key Canarytoken is a perennial favourite on Canarytokens.org, and we’ve heard requests for a similar token for Azure.
In this blog post, we introduce the Azure Login Certificate Token (aka the Azure Token) to Canarytokens.org1.
As with all tokens, you can sprinkle Azure tokens throughout your environment and receive high fidelity notifications whenever they’re used. Place one on your CTO’s laptop, or on every server in your fleet. When attackers breach that laptop, or servers, or machine, they’ll search for useful credentials and discover the Azure tokens. Such juicy credentials are too tempting to ignore, and when they try them, you’ll be alerted to the compromise.
Why is the Azure Login Certificate Token useful?
Azure is second largest provider of cloud infrastructure services in the world. Hundreds of thousands of organizations use Azure Cloud to run their infrastructure. Thanks to the growing Infrastructure as Code movement, many of them are bound to use programmatic command line access to manage their infrastructure.
Attackers know this too.
Searching for Azure credentials is almost standard post-exploitation behaviour and finding login certificates are an attacker’s dream. This token turns that around. One alert, when it matters.
Are Azure tokens just useful to Azure customers? Of course not; Canarytokens are useful across your actual vendor lines. You don’t need to be an AWS customer to deploy actionable and useful AWS API Key Canarytokens, and nor do you need to be an Azure customer to find Azure tokens useful at detecting compromises in your network.
Attackers who find them won’t decide not to use them because they really don’t think you are an Azure shop. They will lick their chops while testing access (and in doing so will tip their hands).
Creating Azure Login Certificate Token
It’s dead simple: head over to canarytokens.org, our public Canarytokens service:
- Select ‘Azure Login Certificate’ from the drop down list.

- Enter an email and a token reminder. We use the email address to notify you when the token is tripped. The reminder you choose will be attached to the alert. (Choose a unique reminder! Nothing sucks more than knowing a token is tripped, but being unsure where you left it). A good Reminder is something like “Azure Token deployed to c:\Users\Administrator\ on DC-LON-02”, which clearly highlights where you placed it.
- Click on “Create my Canarytoken”:
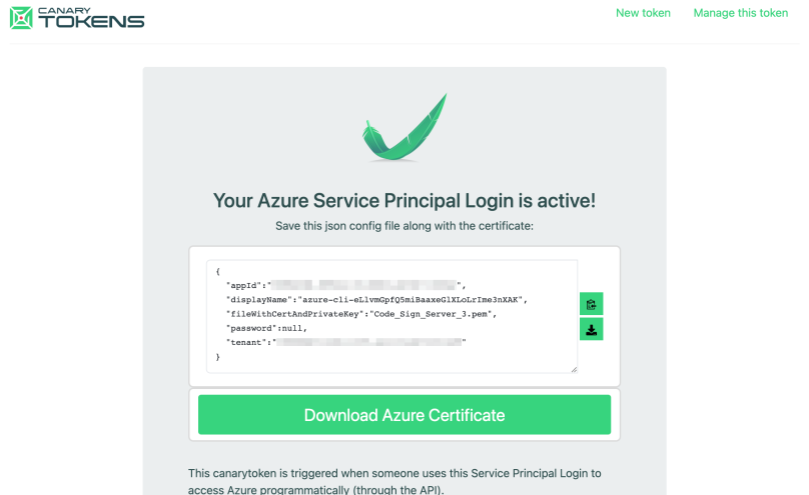
- Congratulations, your new Azure token is ready to be deployed! The output displayed can either be copied into a new file in the place you want to deploy the token, or you can download a file and move it into place. Don’t forget to delete an intermediate copies of the data.
Testing the Azure token
On Linux (with the az tool installed), the token can be triggered simply by running:
$ az login --service-principal -u <app-id> --certificate <certificate> --tenant <tenant>with the relevant parameters updated using the information from the token. As an example:
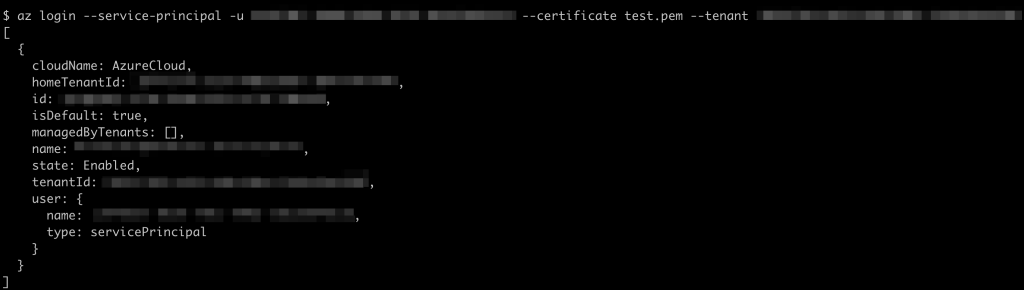
Within 5 to 10 minutes you’ll get an alert notification indicating that the credentials have been used:

Where to deploy the Azure Token
Place the Azure token config file alongside the certificate in a juicy place for potential attackers to find.
Most systems have a
~/.azurefolder (much like the~/.awsor~/.ssh) and you can place the config file and certificate there.Behind the scenes
The route followed is similar to what we do with AWS Key Canarytokens. In short, we pre-generate credentials programmatically into a pool of available credentials because each takes a few seconds to create. These are later allocated to a user when they request a new Azure Canarytoken. We then monitor the usage logs of the Azure accounts in which the credentials were created, and if credentials were used we send the alert.
Wrapping up
The new Azure Canarytoken gives Azure customers (and everyone else) a simple new way to detect breaches, by deploying Azure credentials at no risk to themselves in places attackers would typically find them.
Azure tokens are currently live on Canarytokens.org, and (as always) are completely free.
They take just minutes to create and deploy (even if you are a slow typist). Try them. They are totally worth the time.
Footnotes
1Commercial customers have had this token for a little while now.
-
Swipe right on our new credit card tokens!
Detect breaches with Canary credit cards!
TL;DR;
Today we’re releasing a new Canarytoken type: actual credit cards!
- Head over to canarytokens.org;
- We give you a valid credit card (number, expiration, and CVC);
- If anyone ever attempts to use that card you’ll be notified.
We recommend placing one anywhere you store payment information. If you ever get an alert on it, you know that that data-store has been compromised.
Background
Canaries generally aim to look like something an attacker would want to interact with. It’s why our mantra has always been that Canaries should look valuable (instead of just vulnerable). Historically, these have been network services, or a juicy repository of sensitive information that usually would encourage an attacker to advertise their presence as they move through the network attempting to find firm footholds. Canarytokens expand on that to include files or data that reliably trigger alerts when accessed.
Our new credit card tokens fit this bill perfectly. We give you a perfectly valid credit card. You store it somewhere and if it’s ever used, we will let you know.
Mix it in with your store of saved card data or on payment gateways. An attacker who plans to test the cards (as they normally do when obtaining them) or attackers who try to use them will immediately advertise their presence, and your response team can spring into action.
Using the token
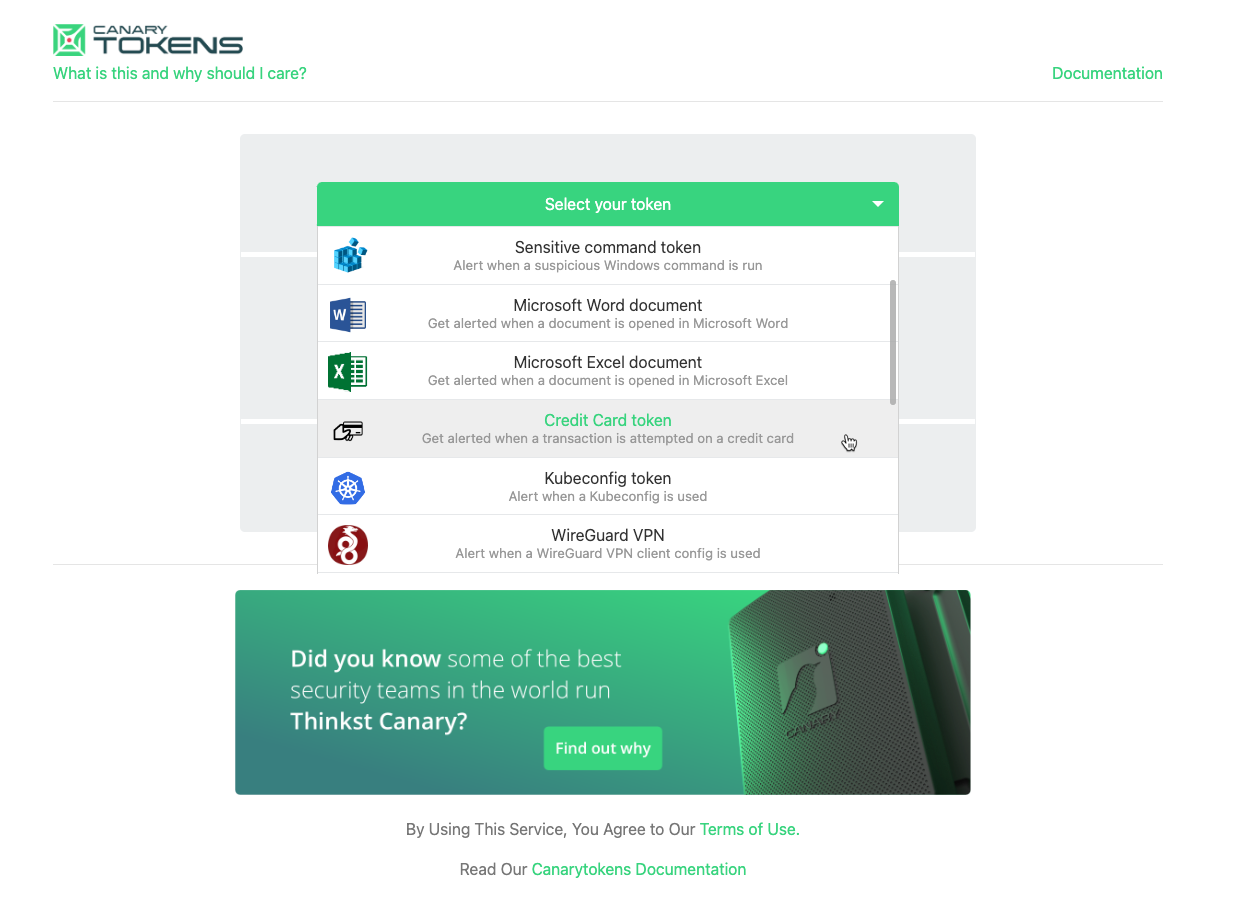
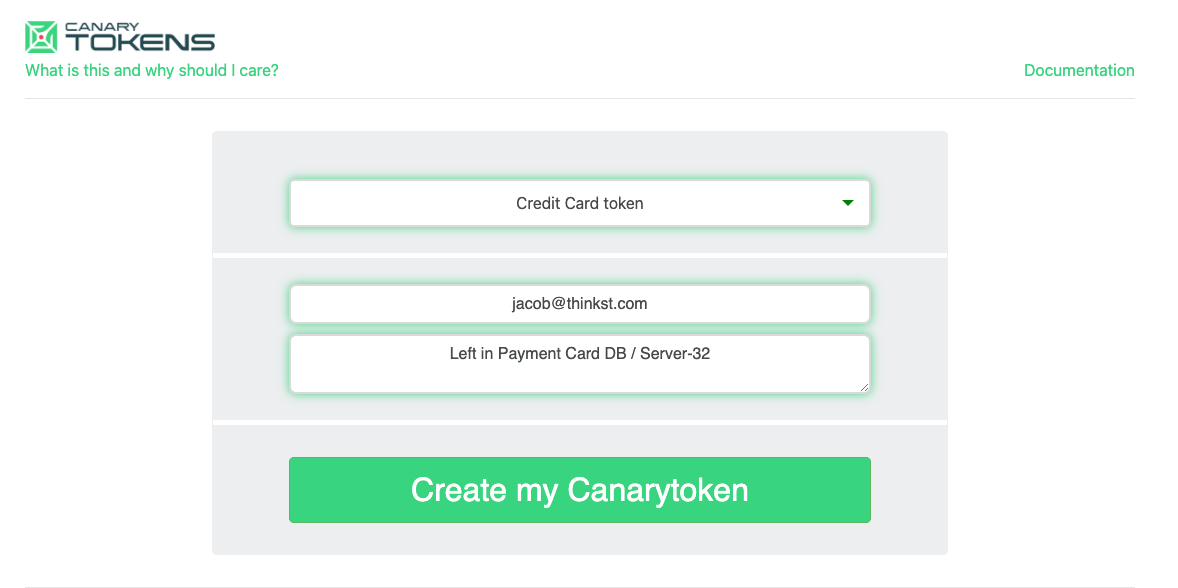
Using this new token is easy, just head over to Canarytokens.org, and select Credit Card token from the dropdown.
Then enter the email address or webhook URL where you want to be notified when an attempted transaction occurs (we never use this to spam you or sell you things, it’s only to notify you when this card is used):
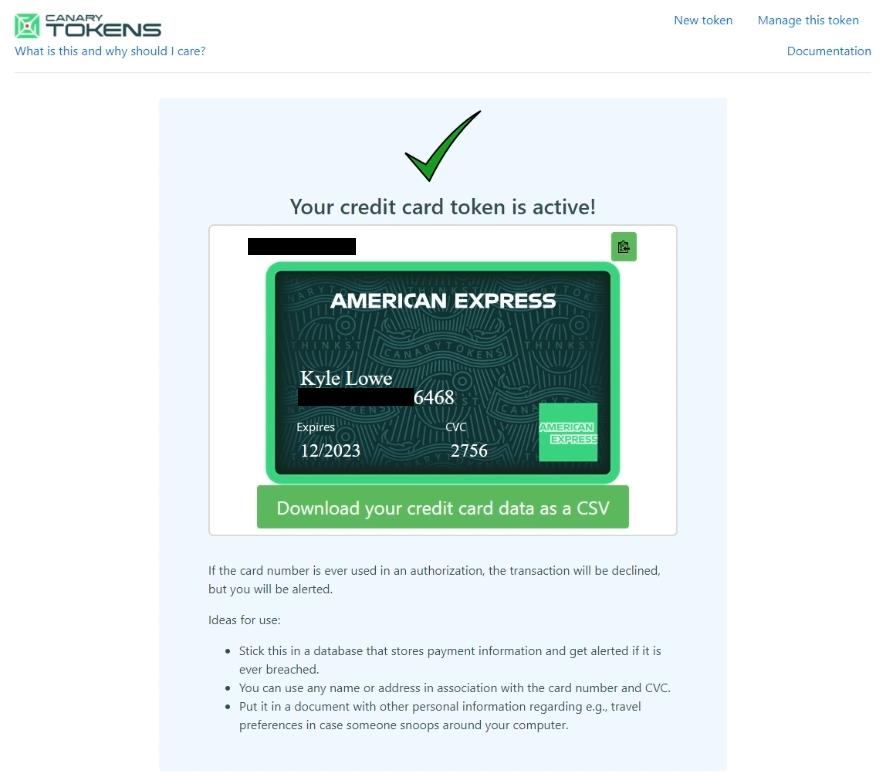
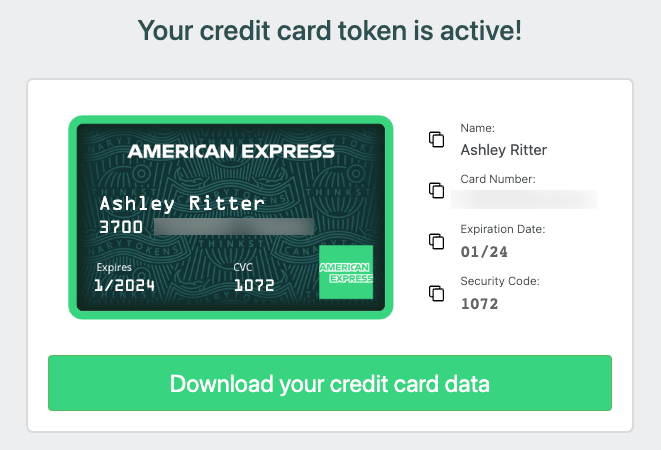
Hit “Create my Canarytoken”, and after a few seconds we will give you a set of unique, valid (real) credit card information, complete with generated name, card number, expiration date, and CVC:
You can also download this information as a CSV to programmatically import into your storage location.
Some places we recommend putting these include:
- Databases where you store customer payment information
- Email inboxes (PSTs) to get an alert on email compromise
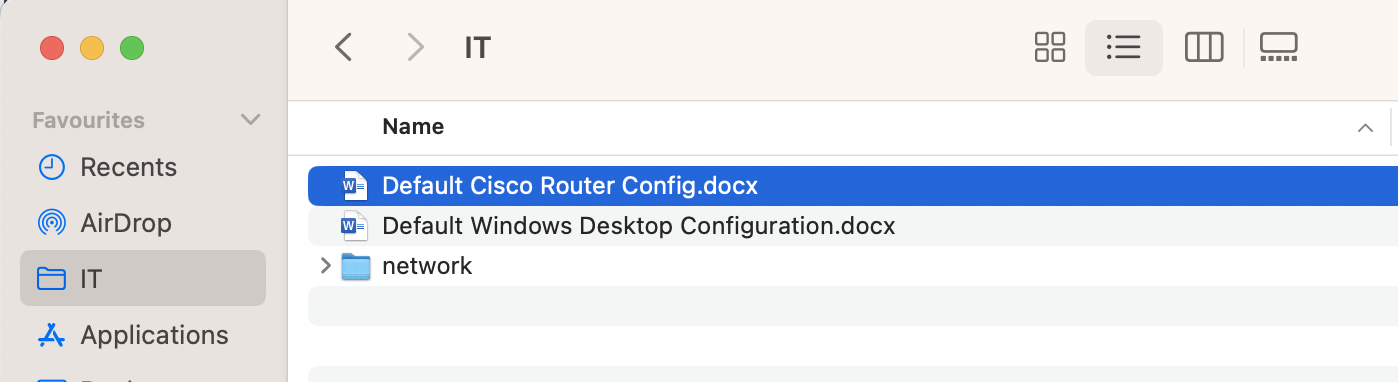
- If you’re concerned about an insider, put one or two in a Word document on an internal file share in a file called something like: “travel payment info.docx”
Take a deep breath and relax, the hard work is all done!
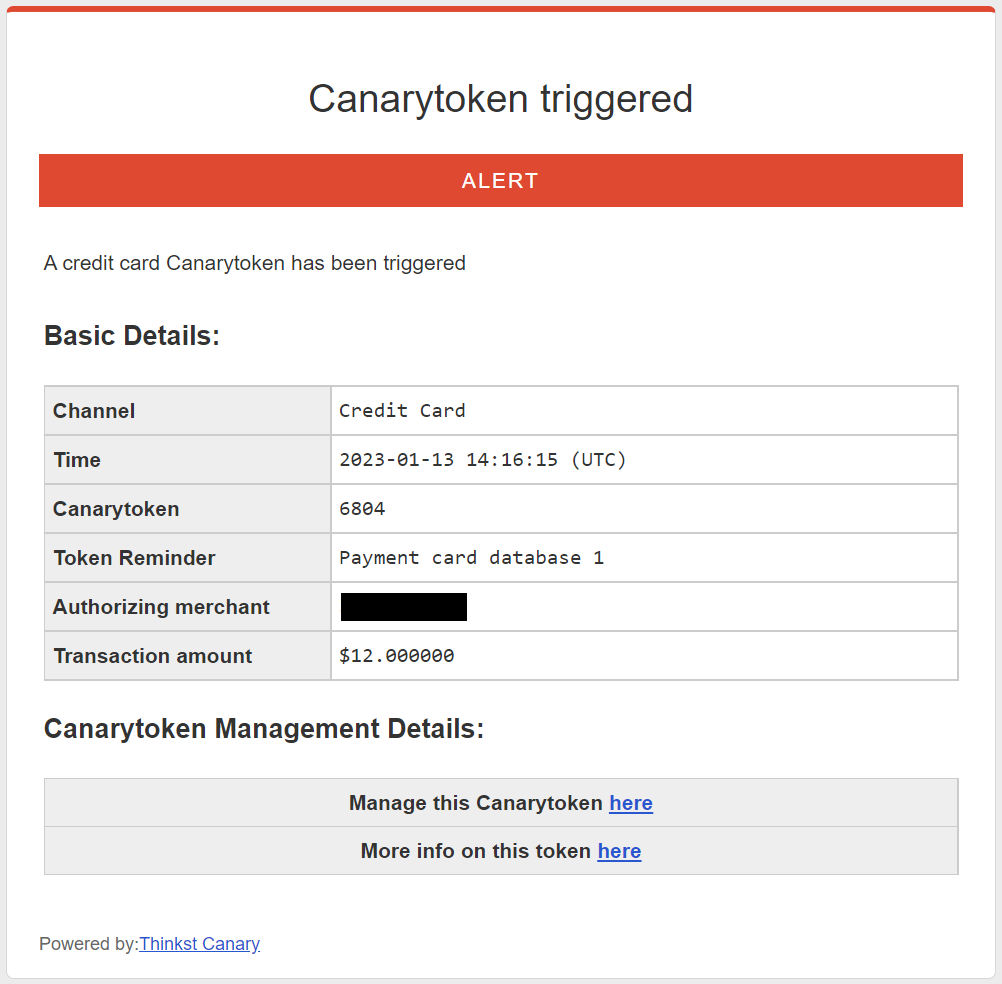
If someone does try to use the card, the transaction will fail, and you’ll get an alert like this in your email with the merchant name, the amount of the transaction, and the note you put in when you created the account:
This is a high quality alert–someone is actively trying to monetize data that they should only have been able to get from wherever you put this token. Like all other well deployed Canarytokens, it also self identifies. You can drop one in each payment store or database and forget about it (at least until the card expires). When you get the alert, you will know immediately that it’s the credit card from the Lisbon DB that was used, and you know immediately where to start investigating.
The chances of a false positive for this alert is close to nil and historically it’s been clear that the quicker you are able to react to the compromise, the more you are able to contain the splash damage of the event.
Conspicuous deception
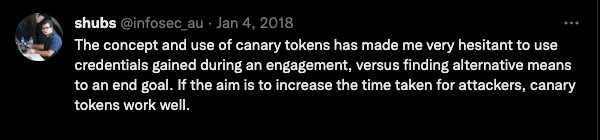
Canaries and Canarytokens have caught red-teamers, fast-fingered insiders and full-blown attackers all over the world. We expected them to when we started Canary. What we didn’t quite expect, was the deterrence factor once attackers became aware of their presence. Last year, during an external red-team engagement, we placed attackers on a presentation laptop in our conference-room. The attackers, knowing our proclivities, were afraid to move beyond that system, paralyzed (almost into inaction) for days. This matches feedback we’ve received both privately and publicly for years:
We’ve been noodling on this a little bit and we’re calling it conspicuous deception. Letting people know you are running Canaries or Canarytokens in order to alter their behavior.
We think the credit card Canarytoken is a good example of this.
If this token has the impact that we hope, savvy attackers, or the buyers of their stolen dumps, will have to start considering the risk of a test swipe destroying the entire set. As merchants and their payment processors leverage this new visibility, they can respond to a test swipe event much more quickly, and with better understanding of the potential splash damage of a breach. Typically credit card companies and banks identify breaches through analysing multiple reports of fraud looking for commonalities in their transactions (such as physical charge locations, websites where the card was used, or payment processors that were involved). This takes time for sufficient fraud reports to flow in before the breached location can be identified. This token allows for near instantaneous identification of a breach.
For low-tier attackers that continue to breach and steal cards without changing their tactics, this token will reduce their ability to monetize and commit fraud. Savvy attackers may start looking for patterns in the bank identification numbers (BINs) that we issue, and proactively deleting or excluding them from their dumps. For this reason we are in discussions with a number of banks to onboard their BINs to the system too, further mixing in legitimate cards with tokens.
It’s a compelling argument: “Would you like attackers to first remove your bank’s cards from dumps they steal?”
The more BINs we can cover with tokens, the more deterrence the token provides – even to organizations that have not deployed these tokens to their environment. This is a benefit of conspicuous deception, the possibility of the dump being tripwired provides protection even if it isn’t actually seeded with tripwires.
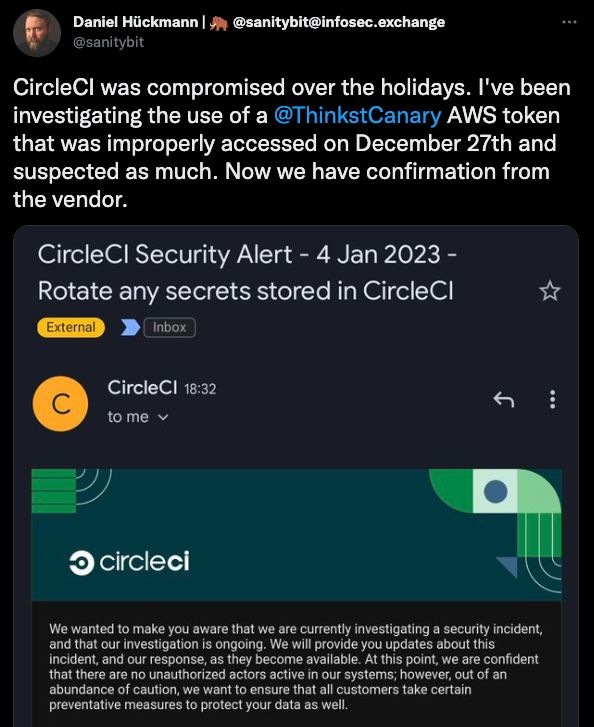
Conclusions
Canaries and Canarytokens are powerful tools that are easily deployed. Recently a security researcher, Daniel Hückman discovered his AWS Canarytokens stored in his CircleCI environment being improperly used.
The credit card Canarytoken provides more ways to monitor your environment, as well as the exposure to your data by third parties. Credit card fraud amounts to almost $40B per year worldwide, we hope that with faster response times to a breach to help make a [small] dent in that figure.
We think that our Canarytokens offer great protection and detection capabilities while being easy to deploy, and cost-effective (free!). By giving them away for free, we introduce a risk for attackers who are trying to monetize their access, from AWS credentials that may provide access to the crown jewels to an Excel document called “2022 Taxes”–attackers need to step a little more carefully.
We hope you’re as excited about this new token as we are (and that it never has to alert you).
Ps. if you are a bank/card-issuer that wants to work with us to help protect your customers too please drop us a note at research@thinkst.com -
Seasonal themes, delighting users & small UX touches

We’ve written before about the effort we put into UX choices in our app. We don’t consider problems solved just because we kicked out a feature in its general vicinity and we are super strong believers in “small things done well”
This came to the fore again recently when we included a “seasonal theme” into customer Consoles and I figured it was worth a brief post to examine our thinking around (even) short-term UX.
In our early days we’d give a brief nod to seasonal changes by slightly altering our Twitter avatar.

Having an actual legit designer on the team gives us significantly more leeway, and so “Console Seasonal Themes” was born. The plan is to (very infrequently) add small non-obtrusive splashes within the customer Console when a reasonable opportunity arises. These splashes should be subtle and hopefully bring a quick smile to someone’s face as they go about their day.
Halloween was the first opportunity to take it for a spin, and Blake threw up a few concepts. We wanted to make sure that the theme never came close to interfering with anyones workflows so ended up with two main areas to decorate: the Console header, and the Canary logo. He chose to animate ghostly birds in the header, and the logo got an appropriately spooky makeover.

It was beautiful but before unleashing it on all customer Consoles, Nick felt strongly that we should also include a button to disable the animation/effect.
We know how some customers prefer to even disable minor window animations in the UI so it was the right call. I was originally ok with simply feature-flagging the effect, which would allow the CS/support teams to disable it if a user complained, but Nick correctly pointed out that this was making the customer do too much to switch off something they never asked for.
So he added a toggle under settings to disable the animation:
This seems like a reasonable place to ship it, but there is still a flaw: how does a user who signs in know that the animation can be turned off in settings? If they don’t know the toggle is there, it might as well not be.
So the team next tried adding a small unobtrusive button on the actual header.

The generic ℹ️ button looked like a candidate for replacement. We went through a few quick variations and settled on a relatable jack-o’-lantern:

The button that only shows up as you approach the click-zone is a pattern we use elsewhere in the app to keep the interface clean while offering needed functionality but once more the problem would be: how does a user know they should go there to float up the button?
Instead of ever making the button completely disappear, we opted to use colour and a slight wiggle to bring the user’s eye to it:

At this point, one would be tempted once more to ship it, but if we are being completely honest, the current jack-o’-button, even with its little wiggle could slip by as part of the animation. It isn’t immediately obvious (unless you’ve spent as much time as we have looking at it) that the lantern is actually a button.
So what we wanted was a button that didn’t look like a button but that people would know was a button, and we wanted it to be well hidden enough but not too much. These kinds of seemingly opposing constraints aren’t atypical in UX. Folks can think in terms of trade-offs or middle-ground, but with enough effort, we usually end up with a better result than just meeting-in-the-middle.
The final form then was wiggling, colour-changing-jack, but with a quick flash when the page loads to let you know that something was under there. It didn’t matter if the text escaped too quickly, because your natural reaction would be to hover in the area (which could then activate the button).

Ultimately, it was worth it. We enjoyed making it happen and customers (at least some of them¹) found it delightful!

___
¹ 153 Consoles disabled the effect (Which is less than 10% of those it ran on). Counter-intuitively, we count that as a win too, since we gave customers that option and they clearly found the button!
-
Company Lessons (from YouTubes “Hot Ones”)
I recently discovered “Hot Ones” on YouTube. If you haven’t seen any of the episodes, you should (because they really are fantastic). This isn’t really a controversial opinion: their YouTube channel has 12 million subscribers and almost 2,6 billion views.
The show has a few lessons that I think are worth noticing/stealing. I’ll discuss 3 of them here (even if they are kinda random).
1) Genuine Warmth
One would expect the show to lean on a kinda gotcha-slapstick routine: we all laugh at celebs suffering, but that isn’t really how it goes. The host (Sean Evans) suffers every moment with his guests and is super empathetic throughout. It’s not adversarial at all and guests reaching the end have a kind of shared bond with the host (and the audience).

Lots of companies are polite to customers (in front of them) but snicker about them behind their backs. Everyone recognizes the meme of tech-support insulting “idiot users” who just don’t get it. Even if this stuff isn’t said directly, it can’t really be hidden. It eventually seeps out of an organizations pores.
This is one of the reasons we focus so hard internally on customer love. We aren’t just doing it to be polite. We know that our customers could have bought anything, but they bought us. We deeply want them to win and we deeply want them to get it. This also can’t be hidden (and also seeps out through our pores).
Putting in the work (off camera)
Sean Evans is an incredible interviewer. There are a bunch of compilations online of guests being impressed by the depth of his questions.

Part of this is because the hot-sauce takes out guests ability to answer:
But the questions are definitely deep and super well researched:
Interviews in the past few years explain how they get this right:
Between episodes is when the real work begins…
Once a guest is booked, the three-person research team goes to work. “There’s a lot of armchair psychology that goes into the show,” says Schonberger. In practice, that means Evans’ brother — Gavin, who lives in Chicago — will compile a dossier. “He’ll basically read like every article there is, every profile, every Reddit AMA, like reading everything that he can find and create,” says Schonberger, noting that they can run to something like 30 pages long. “It’s almost like we’ve created our own Wikipedia template that’s suited to the show.”
Sean, on the other hand, does the videos. He’ll consume 12-24 hours of clips, looking for breadcrumbs. …
Schonberger does some of the podcasts, which means he listens to everything he can get his hands on. It’s the same idea as with the videos, except people are usually less guarded on podcast appearances than they are during video shoots. Then they compare notes, and Evans and Schonberger come up with ten topics to hit during the interview.
the verge
We’ve been championing this line of thinking forever. Boxers don’t win their fights in the ring. It’s why we push so much for putting in the miles. It’s why we spend so much effort working on the tiny details that most people won’t see. It’s because the results are worth it (even if most ppl don’t know what’s behind it).
Following a Script (This is an unusual / subtle one)
When a new person joins us in customer-success/pre-sales we teach them about Canary, why we build it and how we demo it. One personality archetype quickly decides that they will learn the product but will wing-it for demos. They seem slightly surprised that we stay close to a fixed format even if we have been demo’ing Canary (or building it) it for years. Following a script almost seems like an insult to them: they have a mic and they are smart and they can show off the newest features.
With all the praise (in the previous point) for Sean, and now 18 seasons of the show under his belt, it’s worth checking out this quick super cut of guests starting and then clearing the final wing:
Once it locks in, he almost never deviates from the script. We’ve already established that he isn’t lazy, so why do they do it that way?
The same reason we do. Because it works. There are places to customize, and places to go deep but in key areas, it runs on rails. The script works and they’ve stuck with it for 18 seasons.
We understand why some new people don’t want to demo close to the original script: they are smart enough and skilful enough to not need guide-rails. It’s also human nature that after you’ve done a demo n-times, you want to do the n+1th differently.
When you showed 10 people the basic features of the system, you somehow expect that the 11th person needs to see the advanced features because you already spoke about the basics 10 times, but this is a fallacy. The 11th person is also seeing the product for the first time and they may smile through the advanced features – but you aren’t giving them the same experience you gave the first 10 and theres a good chance you leave them confused.
The show is worth watching – you should check it out…
[All this was to allow me to watch tons of YouTube videos calling it management-research]