Security teams can now investigate and acknowledge Canary incidents in Google Security Operations response workflows as cases (with alert and event context intact).
Thinkst Canary now integrates with Google Security Operations response workflows, giving security teams a straightforward way to work high-confidence Canary alerts in the environment they are already used to. Canary incidents can be ingested into Google Security Operations response workflows as cases, where analysts can review alert and event context (and acknowledge incidents when the work is done).
Most teams do not need more alerts. They need alerts they can act on. Because Canary alerts are high-confidence by design, analysts can move quickly from detection to investigation, spending less time validating the alert and more time understanding what access an attacker may already have gained and how far they have moved.
The integration also surfaces hostnames, IP addresses, and other useful entities in Google Security Operations to support enrichment and investigation. Teams can choose whether to include the full alert stream or exclude purely informative operational alerts, depending on how they want to run the workflow.
Key benefits of the integration
High-fidelity alert intake: Bring Thinkst Canary incidents into Google Security Operations as cases with alerts and event context.
Faster investigations: Review extracted entities such as IP addresses and hostnames to accelerate triage and enrichment.
Less tool switching: Acknowledge a Canary incident from within Google Security Operations instead of switching back to the Canary Console for a routine workflow step.
Flexible alert filtering: Use the connector setting to suppress informative alerts when the team wants to focus only on response-relevant incidents.
Use cases
Confirmed intrusion and breach scoping
If an attacker interacts with a Canary service, the alert gives analysts a strong indication that the network has been breached. From there, teams can use Google Security Operations to investigate the attacker’s path, determine what access was obtained, and assess the extent of lateral movement or broader compromise.
Unauthorised internal reconnaissance
If an attacker scans or probes a Canary, the alert provides a reliable signal of malicious activity inside the environment. Analysts can investigate where the activity originated, identify related systems or users, and understand how the attacker gained an internal foothold.
Early lateral movement detection
When an attacker attempts to move through the network and interacts with a Canary, the alert can open a Google Security Operations case for immediate review. Analysts can then trace related activity and determine whether additional systems or credentials have been compromised.
Rapid validation of suspicious behaviour
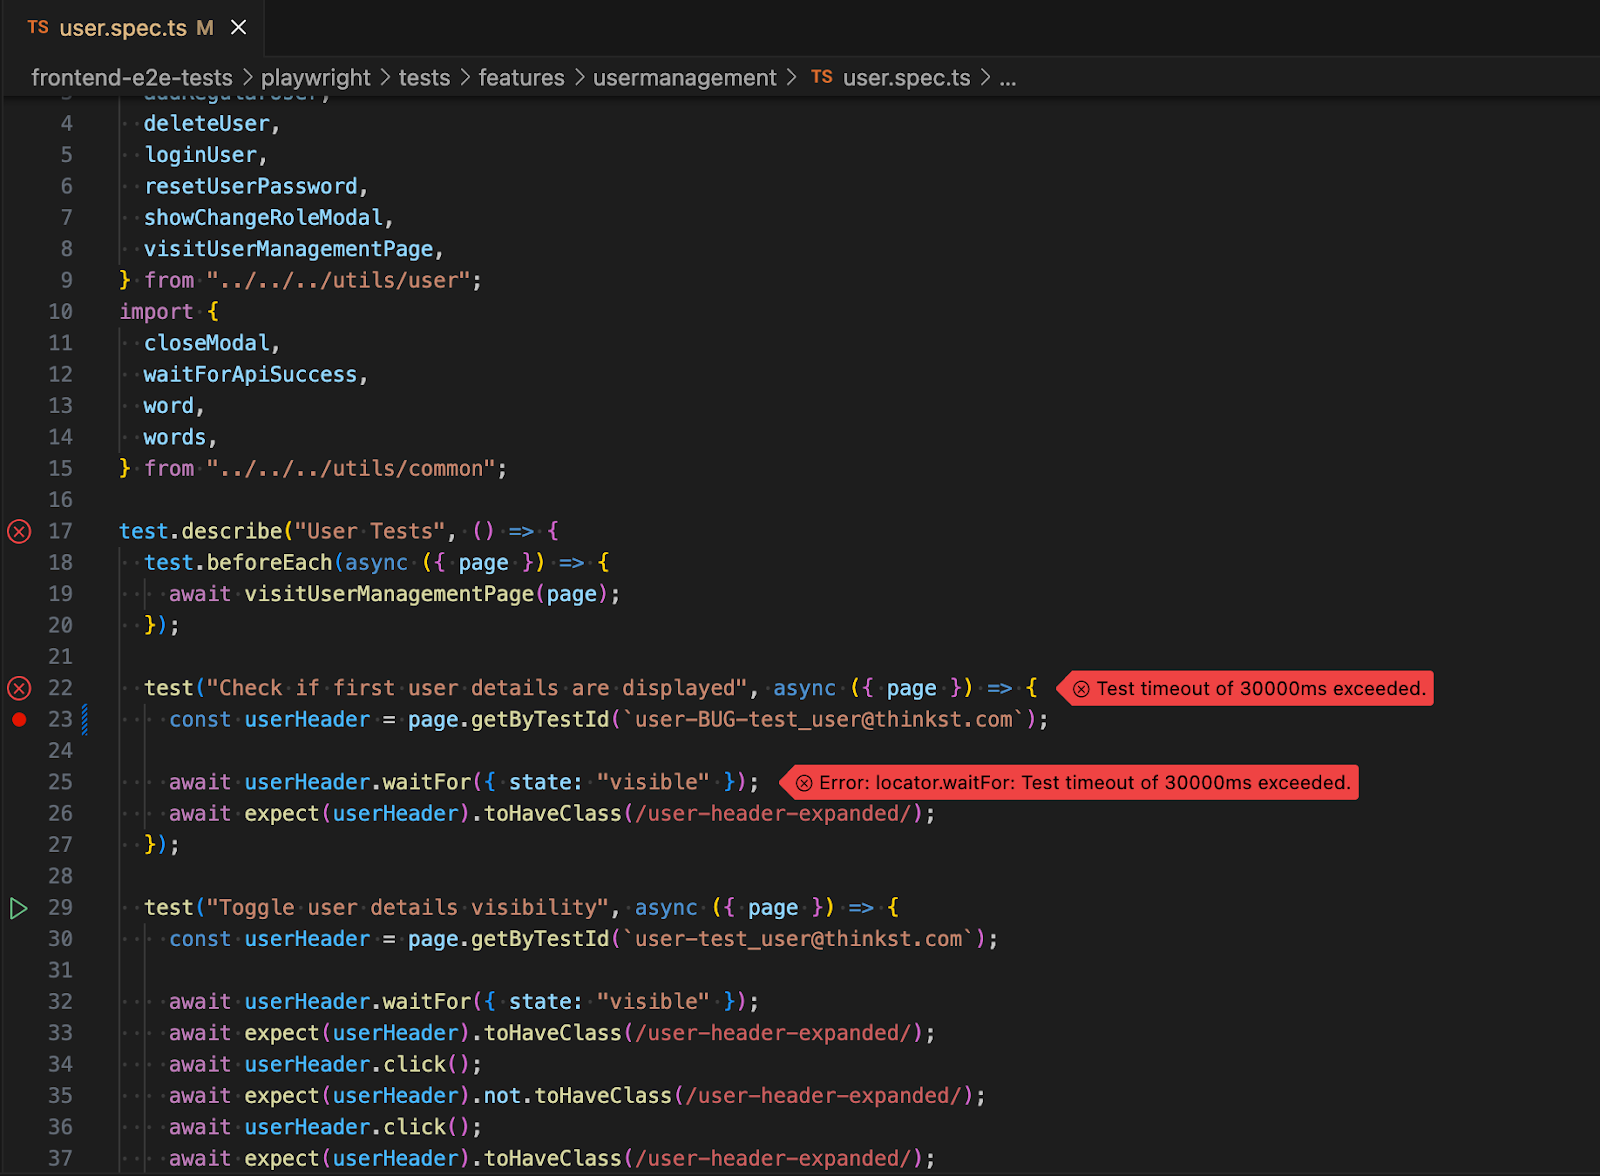
When other detections or weak signals suggest a possible compromise, a Canary alert can provide the confirmation analysts need to prioritise response. Instead of spending time debating whether the activity is benign, the team can focus on containment and investigation.
Getting started
Customers can get started by installing the Thinkst integration from the Google Security Operations Content Hub and configuring the connector with their Canary Console details and API token. For step-by-step configuration guidance and troubleshooting support, see: Configuring Google SecOps SOAR Integration.
I’m heading home post another RSAC, and it always leaves me with mixed feelings. You get to meet old hax0r-friends who once eschewed the corporate event, and while young-me hates it, we’ve written at length about how well a booth actually works for us as a young product company.
This year felt different though. It was still great for us to meet customers and sign new ones, but we’ve kinda carved a niche that flows against the general current. The general mood was a little more subdued.
It’s so strange to see companies that ostensibly have products that do solve (some) problems pivot all their messaging towards problems they objectively can’t solve (yet). And very few ppl can indeed solve “secure AI” yet, because for the most part, we barely know what this means/how this is going to play out in the enterprises. So why does it happen so frequently? Why is the RSAC floor so dominated by promises that can’t be kept?
Because incentives..
A long (long) time ago, the ever quotable Dave Aitel mentioned that RSAC is not where people go to sell their security products, it’s where they go to sell their security companies. Seen through this lens, a very clear pattern emerges:
An area is declared hot;
Funding swings towards this area;
A bunch of startups pop up in response to this;
The market (and analysts) start asking established players what their $hot-space strategy is;
Some seasoned founders raise from brand-name VC’s and splash out in $hot-space;
Headlines, funding announcements, and a fancy RSAC/Blackhat booth make their domination of the space obvious;
Big established player buys $hot-space leader;
What’s interesting from this dance, is how (almost) everyone gets a “good” result: VC’s get their return on investment and the founders get their liquidity event. $Big-company gets their stock-bump, because the analysts/markets reward the acquisition.
Predictably, within about 16 months, the space would have slightly fizzled, $Big-company would have fired lots of the team that joined, and the founders would have cycled out (possibly looking to put in another coin and play again).
Everyone made some money (even if (almost) nobody made anything useful!)
The main losers are the customers, who get all this confusion shoved down their throats without actually getting better products (because you will notice, that actual better products don’t feature in the dance at all).
Eventually, $Big-company will be poorer for this strategy too. Instead of their products (and their product teams) being revitalized by useful innovation-protein, they get used to sugary-announcement-bumps, which leads to kinda fatty bloating that eventually hurts more than it helps. But those are long cycles and there are many fat bonus years before that calcification kills.
It explains why we have these crazy infosec themes that barely resemble the actual problems faced by customers, and why millions keep changing hands while we still struggle with problems we had in the 2000s.
I used to ask how it was, that so many companies didn’t even try to demo their products on the floor. But then I realised Dave was right: for the most part, security products are just not what’s on sale..
Last week we concluded the deal to acquire 100% of UK-based DeceptIQ. We welcome them to the flock.
DeceptIQ is built by red-teamers with a deep desire to turn the tables on attackers. In our ten years of doing Canary, we’ve never seen such a strong natural alignment.
We are super excited to write future chapters (to help defenders win) together.
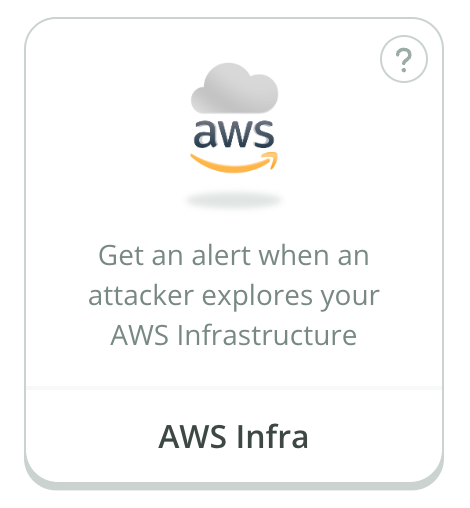
Canarytokens have proved themselves over the last decade as an easy-to-deploy breach detection tool. Our free Canarytokens service has supported AWS API keys since 2017. The concept is straightforward: you sprinkle decoy API keys in your code repos / Lambda configurations / virtual machine disks; when the credentials are used by attackers, you’ll get an alert in your mailbox. They make an excellent (and simple) way to identify malicious actors inside your infrastructure, in the early stages of the attack when attackers are gathering information about your environment.1
This week we’re excited to broaden our support for decoy AWS assets by introducing the AWS Infrastructure Canarytoken, available immediately on https://canarytokens.org without signup (for free!). The AWS Infrastructure Canarytoken is quite simple: we help you deploy decoy resources in your AWS account. These assets will look enticing to attackers; when your AWS account is compromised and they explore your account, they’ll see the decoys, interact with them, and you’ll get an alert. Previously you could create decoy resources and alerting rules manually; with our new addition the process is much quicker and more straightforward.
The way it works is that we help you design a Terraform module that you apply to a specific region of your choosing in your AWS account. The module will set up decoy assets (DynamoDB tables, S3 buckets, SSM Parameters, SecretsManager Secrets, and SQS Queues) in your AWS account’s region, and configure your Cloudtrail logging such that events related to the decoys will generate alerts delivered to your mailbox via Canarytokens.org.
In this post, we’ll walk through how to create and deploy an AWS Infrastructure Canarytoken, and describe how we address the security risks associated with cross-account data flows.
Pre-requisites
To create a new AWS Infrastructure Canarytoken in an AWS account you’ll need:
A working AWS account (let’s call it 123456789012 for our examples below) with a region where the decoys will be created (we’ll go with the venerable us-east-1 in our examples below).
An AWS CLI session with permission to create a new IAM Role, IAM Policy, and attach the policy to the role, all in your AWS account. I.e. $ aws sts get-caller-identity works, and is empowered to make IAM changes. The easiest way to get a session is via CloudShell from your AWS console.
Terraform is installed, and set up to add resources in the AWS account. You might have added credentials as environment variables, or inside Terraform files, the provider has several options.
Your target AWS region is already enabled. If you’ve recently enabled the region, it can take up to several hours before it is fully enabled.
Creating an AWS Infrastructure Canarytoken
There are three steps to creating the AWS Infrastructure Canarytoken. First, you’ll set up the AWS integration with Canarytokens.org. Then you’ll create a decoy infrastructure design. Finally, you’ll deploy it with Terraform.
Under the “Canarytoken Settings”, enter the AWS account number and select the region (the region must already be enabled in your account, review your list here):
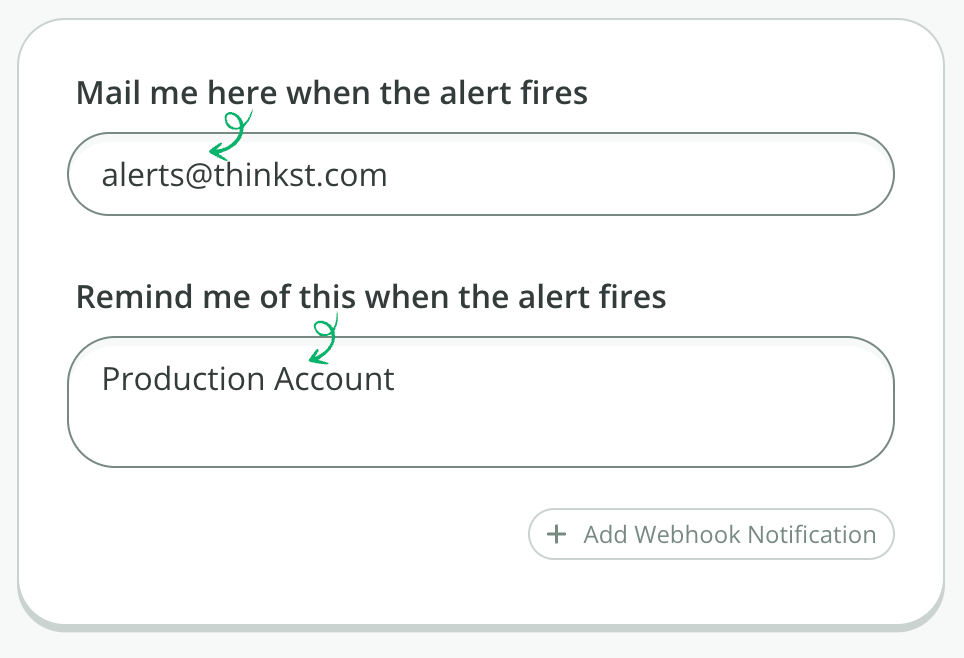
For the alert details, enter an email address where we’ll send the alert, and a reminder message we’ll include in the alert. We recommend a description of the AWS account, so you quickly can tell which account was affected:
Click “Start creating Canarytoken”.
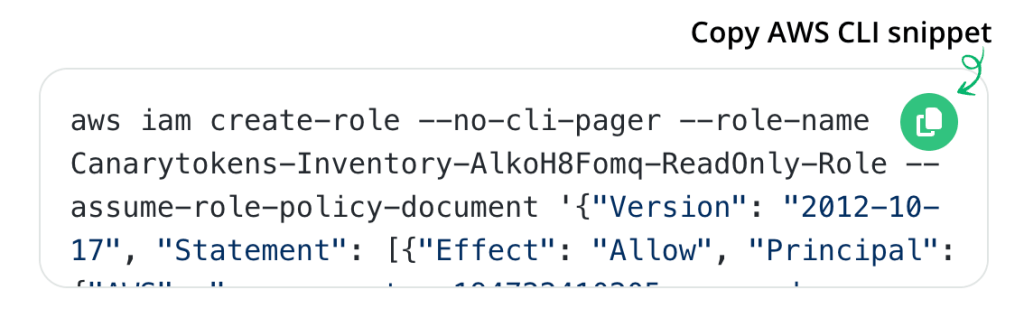
The next screen shows three AWS CLI commands, which you need to run in the authenticated AW CLI session. Click “Copy AWS CLI snippet”, and paste into your shell:These commands will create a new IAM Policy, a new IAM Role, and attach the role to the policy. This will allow Canarytokens.org to fetch the names of certain asset types in your account, in order to generate decoys with similar names. The policy contains the asset types we list, and is a least-privilege policy. For example, it allows us to list your current S3 bucket names, but not read anything inside the buckets (including object names). Ditto for DynamoDB tables, SSM Parameters, SecretsManager secrets, and SQS Queues.
When you’ve created the Policy, Role, and attachment, click “Continue”.
Canarytokens.org will connect to your AWS account, and perform a name-only inventory of your S3 buckets, DynamoDB tables, SSM Parameters, SecretsManager secrets, and SQS Queues. It will then generate a proposed decoy design for you (see below for more details on how we do that), and show you an editor to make changes to the design.
Step 2: Creating a decoy infrastructure design
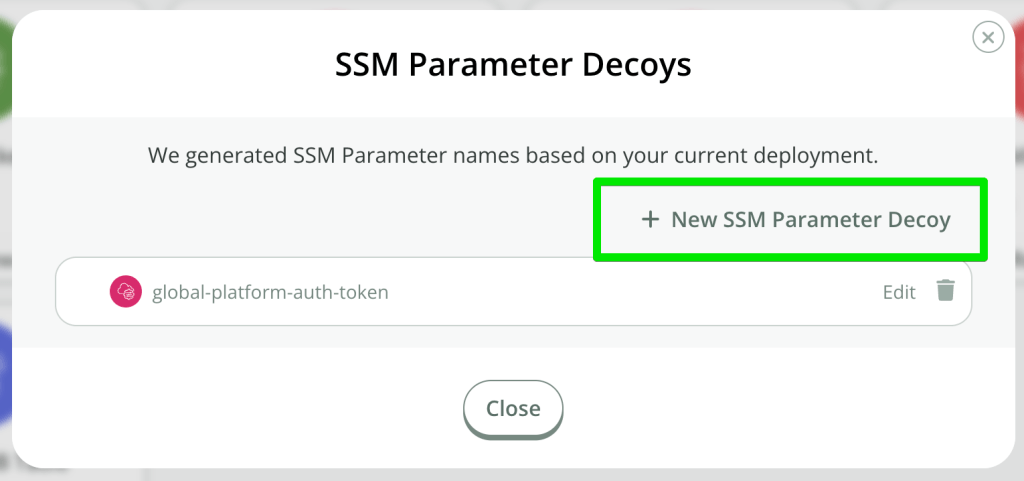
In the design editor, click on the decoy types to review the design. If you’d like to add additional decoys, simply click the “+ … Decoy” button:
If you’d like to edit the name, or remove this decoy, use the “Edit” or trashcan icons respectively:
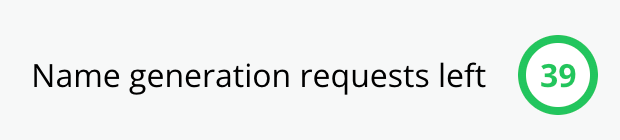
We use Google Gemini to assist with generating names; each Canarytoken gets up to 50 name generation requests and we show your status as you build your design. Note that generating the first plan consumes part of your quota, so you’ll always see less than 50 on the initial page load:When the count drops to zero, then we’ll continue to simply generate random names, no longer relying on Gemini.
When you’re happy with your design, click “Save configuration”.
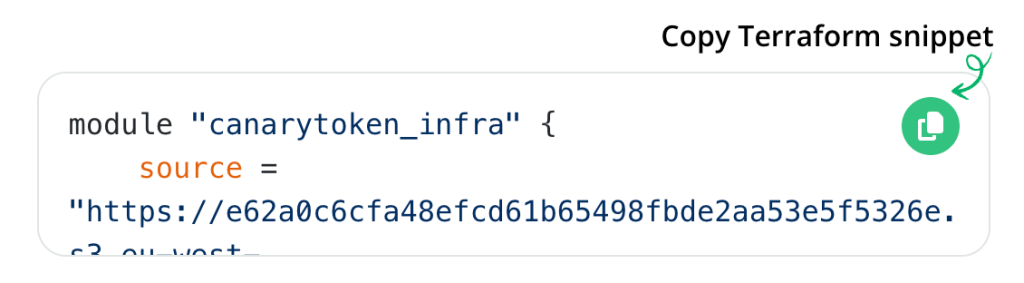
Step 3: Deploying the design with Terraform
On the final step, we save your design into a Terraform module which we host for you. What remains is for you to add a reference to the module in your Terraform file, and apply the plan:
Click the copy icon:
In your Terraform plan, include the module, and save:
Run $ terraform init to install the module.
Run $ terraform apply to deploy the decoy infrastructure.
Your decoy assets are now in place.
You can test by browsing one of the decoys in the AWS Console, or examining it through the AWS CLI. For instance, if one of your decoys was an S3 Bucket with an object inside, you could list it to trigger the Canarytoken like this: $ aws s3 ls s3://devproject/service-creds
With that, your first AWS Infrastructure Canarytoken deployment is done! Let’s take a closer look at what’s happening behind the scenes.
How we generate decoy names
When building this new Canarytoken type, we wanted to make the decoys blend in with your current AWS infrastructure.2 This feature stands on two legs: an inventory of your AWS account, and a name generator.
The inventory process sets up a temporary read-only connection between Canarytokens.org and your AWS account, which allows us to list the names of specific asset classes in the region you picked (except for S3 buckets, which are globally unique).
Once we have your current asset names, we’ll pass them to Google Gemini to propose additional names that are similar to yours. We also base the number of proposed decoys on your current count. There is a cost associated with each name generation request made to Gemini. We don’t pass it on to you, which means we have to watch our spend. We solve this through assigning a quota to each Canarytoken for name generations.
The proposed decoy names will match your current assets, along with additional enticing names.
Cross-account access
Separately from name generation, we’ve adopted an architecture in which we isolate functions in specific AWS accounts, to limit risk in any single account. To this end, we have to carefully consider how your AWS accounts can send us data.
There are two directions for access. When creating the Canarytoken, you set up temporary read-only access to allow Canarytokens.org to pull information from your account. This access is short-term and only available during the creation or edit stages. We use AWS’ recommended pattern for access to third party accounts; it hinges on a so-called ExternalId. (which is part of the IAM policy you create). When you’ve created your Terraform module at Canarytokens.org, we delete the ExternalId so we don’t retain long-term inventory access. You could remove the IAM policy and IAM role yourself if you like, but we still wanted to proactively sever the connection from our side, and using an ExternalId does just that.
The second direction of access is long-term, and involves your AWS account pushing select Cloudtrail events to Canarytokens.org. This is how we monitor the decoys for access. We take care to set up Cloudtrail such that only events related to the decoys are sent to us. An EventBridge rule in your account filters events, before sending them on to us. The filter is an allowlist; we’ve taken care to specifically limit it to known events about the decoys, ensuring that we won’t accidentally see events related to non-decoys. Naturally this is inspectable by looking at the Terraform module.
Costs
Deploying this Canarytoken into your account will consume AWS resources and count towards your quotas or billing. This will typically be single-digit dollars per month. The highest fixed cost is SecretsManager Secrets, which AWS charges $0.40 per secret per month. Apart from that, all others are API call-based pricing. Decoy resources aren’t hit regularly by design, so their charges will typically be cents per month.
For obvious reasons, your AWS bill is for your account. We pay for our usage of AWS to process your incoming EventBridge events when they hit our account, and we pay for Gemini.
Editing the decoys at a later stage
We’ve also included the ability to later edit your Terraform plan. By accessing the Manage link for your Canarytoken, you can re-enter the editor. Note that you’ll need to tell us the ExternalId so that we can re-inventory the account. The wizard describes this in more detail.
Final thoughts
We’ve been noodling on this for a bit, as an extension of the previous work we’ve done, and we’re excited to release it. Dev, Lisa, and Vittoria have created a powerful new Canarytoken type. Like our other Canaries and Canarytokens, they deploy quickly and give you the heads-up when you need it most. We’d love it if you took it for a spin!
Footnotes
On the commercial side, we’ve also supported S3 Bucket Canarytokens for a long time, in addition to the AWS API Keys. ↩︎
We don’t believe this is a requirement for Canarytokens generally, however it seemed like a fun challenge. ↩︎
Like many in the industry, we are mentally preparing for the trip out to Las Vegas for the US’s crowning trio of big security conferences: BSidesLV, Black Hat USA, and DEF CON. Every year tens of thousands make the annual pilgrimage to the “Hacker Summer Camp” trifecta to see friends, learn from the smorgasbord of tasks and trainings, and share their knowledge far and wide.
Each year we at the ThinkstScapes HQ find great content worth highlighting from these longstanding pillars of the conference scene. The talks below are the ones we’re most keen to watch, but there’s always a few that outshine their abstracts and surprise us–look for these sleeper-standouts in the Q3 edition!
Black Hat USA
AppleStorm – Unmasking the Privacy Risks of Apple Intelligence by Yoav Magid (Also at DEF CON) — Privacy is a cornerstone of Apple’s marketing, and a core part of their Apple Intelligence offering. This talk should offer a glimpse into how that system operates, where potential privacy gaps exist, and how to introspect on a system that is by definition trying to minimize privacy leaks. Taking marketing claims at face value is a recipe to get burned; this talk should teach the audience how to inspect those claims a little deeper, at least for the Apple iOS ecosystem.
I’m in Your Logs Now, Deceiving Your Analysts and Blinding Your EDR by Olaf Hartong — After the CrowdStrike debacle, Microsoft is pushing EDR and other defensive agents out of the kernel–forcing them to rely on their own telemetry. If the Windows ETW framework is susceptible to manipulation of telemetry streams, then it could undermine the data underlying EDR entirely. This talk promises to shine some light into a deep dark corner of Windows security, and we’re keen to see what the speaker uncovered.
Ghosts in the Machine Check – Conjuring Hardware Failures to Breach CPU Privilege Boundaries by Christopher Domas (Also at DEF CON) — Christopher has a knack for explaining deep CPU/ISA flaws and highlighting their impact. His talks usually offer more than promised, and in this abstract he’s promising a lot. We’re keen to see how abuses to the CPU can result in privilege escalation, and what can be done about it as a defender.
When ‘Changed Files’ Changed Everything: Uncovering and Responding to the tj-actions Supply Chain Breach by Varun Sharma and Ashish Kurmi — This talk is a stand in for the table top exercise we all should have had, but haven’t got around to yet. CI/CD pipelines have famously been abused, and a deep dive into how this recent malicious change was caught and recovered from should be both interesting and useful to all types of organizations.
Windows Hell No for Business by Baptiste David and Tillman Oßwald — Identity is the new perimeter, and device manufacturers have been working to make biometric authentication seamless and secure. This talk promises a deep dive into the data flows in Windows Hello, which can be used to authenticate to an IdP in addition to just local machines. The abstract promises to show a way where biometric data can be modified on device to allow an attacker to authenticate as any other enrolled user–even to cloud services.
AI Agents for Offsec with Zero False Positives by Brendan Dolan-Gavitt — XBOW recently reached the #1 spot on HackerOne’s US leaderboard using their fully-autonomous LLM-based agents. This talk offers a glimpse at the science behind the pwnage for how to leverage LLM’s powerful capabilities without drowning in false positive noise.
Safe Harbor or Hostile Waters: Unveiling the Hidden Perils of the TorchScript Engine in PyTorch by Ji’an Zhou and Li’shuo Song (Also at DEF CON) — ML models are often packed as Python pickles, which are carelessly downloaded and run. To minimize the risk of pickle RCE attacks, PyTorch generally only loads the weights. However, there is a new execution engine that is embedded into Torch’s engine: TorchScript. This talk should shine a light on this unknown corner of ML model security, and hopefully remind us that there are still risks to YOLO loading random models from the internet.
DEF CON
You snooze you lose: RPC-Racer winning RPC endpoints against services by Ron Ben Yizhak — RPC has been around longer than many of us care to consider, but has recently had a resurgence in research against it. This talk offers insights into how the OS registers RPC services, and shows that being first in line allows for your untrusted code to serve as the RPC service for high-privileged OS components. It’s great to see others digging into this legacy system and finding new results.
The (Un)Rightful Heir: My dMSA Is Your New Domain Admin by Yuval Gordon (Also at BSidesLV) — We love seeing a good o’ fashion AD attack, and this one looks like it brings it into the 21st century. dMSA accounts are new for many AD administrators, especially those who are running a hybrid AD environment, so they are likely misconfigured. AD vulnerabilities are the bread and butter for many attackers elevating their privileges, so it’s nice to see there are already eyes on the new account scheme.
Zero Trust, Total Bust – Breaking into thousands of cloud-based VPNs with one bug by David Cash and Rich Warren — Zero Trust has been an RSAC buzzword for a couple of years, so it’s good that folks are finally putting these “next-gen” VPNs to the test. Perhaps surprising to no one, ZTNA is simply a newer VPN, and like the VPNs of yesteryear, they can also have security flaws. This talk should dump some cold water on the ZTNA hype train and help defenders think beyond the buzzwords when it comes to secure networking.
Turning Microsoft’s Login Page into our Phishing Infrastructure by Keanu Nys — Phishing M365 has been an actively-contested battleground for the last few years. This talk promises the Holy Grail of Entra ID phishing (from Microsoft’s real login domain), it will be well-worth a listen to see how defenders can adapt and keep their users safe.
Journey to the center of the PSTN: How I became a phone company, and why you should too. by Enzo Damato — We too often forget about the legacy tail of PSTN land-lines and how they are a network connection without next-gen firewalls or DLP monitoring. This talk will reveal the technical and regulatory aspects of connecting to this global network and what that can mean for security.
BSidesLV
.e’X’es and ‘O’auths (They Haunt Me): In-Depth Analysis of OAuth/OIDC Misconfigurations and Token Replay Attacks by Darryl Baker — OAuth and OIDC are both complex and commonplace. This talk promises to show how that can be a dangerous combination, and what defenders can do to reduce their risk of misconfigurations.
Our next ThinkstScapes release will feature content from this list and much more, subscribe for an email notification when each quarterly edition is dropped (no spam, we promise)! We’ll have part of the Thinkst crew out at Black Hat, if you’re there, stop by our booth, 5618, and say hi!
You’re moments away from finishing a feature you’ve been working on for the last two weeks when you get a Slack notification that the frontend test pipeline has failed for the 824th time that year.
It’s the same handful of flaky tests that fail whenever there’s a half-moon.
You make a note to fix these tests and get back to finishing that feature.
We were in this situation and asked ourselves whether we enjoyed building and maintaining our frontend test system. The answer was no, so we tore it down and built something we could be proud of.
Getting your frontend testing infrastructure stable is tough. Timing is tricky to get right when your tests are at the whim of network requests and browser rendering cycles. However, with the right tools and a solid foundation, you can do it, and it’s worth the effort.
A promising testing pipeline isn’t just about catching issues; it’s a force multiplier for your development team, empowering them to move faster, confidently, and focus on doing their best work.
In this post, we walk through why we switched from Cypress to Playwright, how we made the switch, and what the outcomes have been.
What was wrong with our old testing system anyways?
Our Canary Console frontend has decades of person-years poured into it. We sweatthesmall details. A while back, we settled on Cypress for running frontend integration tests, but over time, it’s become that mystery Tupperware in the office fridge — nobody wants to open it because of what you might find, but it’s still there, singing its siren song.
Our integration tests need to interact with live Consoles, and each Console has various settings and features that can be enabled or disabled (for example, we can turn SAML authentication on or off for each customer, which affects part of the frontend). We were hitting limitations in Cypress and the testbed architecture, which took too much time to work around.
Here’s an outline of how frontend testing was integrated into our CI flow:
The Cypress agent interacted with a single, persistent, live Canary Console.
The Action would send failures to Slack.
In this design, we never reset the Console state between testing rounds. If tests don’t clean up after themselves, the next round of tests will run against an unknown state.
Since the tests shared a single Console, we couldn’t run them in parallel, so either developers were bottlenecked on the single testbed, or they tested on non-standard testbeds.
It was a mess; so much that no one wanted to write tests, and our frontend team didn’t want to be involved with the project. So, how did we get folks excited about writing end-to-end tests?
Yearning for the ocean
If this system was perfect, what would that look like? Why not aim at that? We came up with:
The tests would run on every commit, even on feature branches.
The test suites would have zero flaky tests. Why can’t the tests run for months without failing due to flakiness?
The test suite would execute rapidly. Prompt feedback is essential.
The test system would be portable. It would run in our CI and on our developers’ local machines.
Writing tests should be enjoyable; at least, we shouldn’t want to bang our heads on our desks while writing them. If the tests aren’t easy to write, how will you craft long, comprehensive test cases?
Having these points as our guiding constellation, we knew that getting close would mean raising our team’s floor to a new level. The plan became:
Make a repeatable test environment in containers.
Move from Cypress to Playwright for writing and running tests.
Focus on flaky tests.
Ensure our main UX flows were covered.
Foundation
We moved our entire stack into a collection of Docker containers we could spin up anywhere and anytime.
We could run the container system with a fixed pristine database that resets each time the stack starts up, meaning our state is always the same. The only thing that would change would be the code. Using Docker was a great start at solving our stability issue.
Our setup solved 1 and 4 of our dream list, and gave us a headstart on 2.
For #1, Github Actions can run arbitrary Docker Compose setups. We could spin up our entire stack for each commit and run the new code against that isolated environment.
For # 2, The stability afforded us by being able to reset our state when we spun up the containers meant that we had a good base for a system that wasn’t flaky, thanks to our pristine database that never changes. There was still work to fix individual tests, which we’ll explore in more detail later.
For #4, Since portable environments are what Docker is all about, the testing environment could run in GH Actions and on our local machines. Both testing environments are identical.
The foundation set us up for success, but we needed to ensure that our test cases followed suit.
Joy for devs and force multiplier (why we moved to Playwright)
As trite as it sounds, writing Cypress tests didn’t spark joy. There is a list of areas where Cypress pales compared to Playwright (and we’ll get into those shortly), but we didn’t like using the tool at a base level.
We decided to trash all our Cypress tests and start again in Playwright. If you have a collection of Cypress tests that work well, keep those around. We didn’t have that many, and almost none of those tests were useful. After we weighed up the pros and cons, switching was a no-brainer.
Cypress Eccentricities
The Cypress test framework has many idiosyncrasies that add unneeded friction to writing and reading tests.
Cypress commands aren’t promises. They aren’t synchronous, either. Commands are added to a queue and only run after the function returns. Take a look at this example:
const username = cy.get('#username').invoke('val');
console.log(username); // This logs a "Chainable" object, not the actual value
Logging the username variable returns a Cypress chainable, not a resolved DOM element or value. When console.log() runs, Cypress has yet to execute the cy.get command. To get the value, you need to use a .then(), which waits for the command to resolve.
Consider a test that verifies whether the sum of a shopping cart’s item prices, VAT, and shipping cost matches the total displayed.
In Cypress, there are two ways to do this. You either need to use then, which waits for your previous command to complete and then executes your callback:
Or you can use aliases, which are essentially variables you can reference in other parts of your Cypress test:
describe('Cart total exact match validation with aliases', () => {
it('should exactly equal item price + shipping + VAT of $10.00', () => {
cy.visit('/cart');
// Get item price and alias it
cy.get('[data-testid="cart-item"] [data-testid="item-price"]')
.invoke('text')
.then(text =>parseFloat(text.replace('$', '')))
.as('itemPrice');
// Get shipping cost and alias it
cy.get('[data-testid="shipping-cost"]')
.invoke('text')
.then(text =>parseFloat(text.replace('$', '')))
.as('shippingCost');
// Get VAT and alias it
cy.get('[data-testid="vat-amount"]')
.invoke('text')
.then(text =>parseFloat(text.replace('$', '')))
.as('vatAmount');
// Use cy.then to access all aliases
cy.then(function () {
const actualTotal =this.itemPrice +this.shippingCost +this.vatAmount;
const expectedTotal =10.00;
expect(actualTotal).to.equal(expectedTotal);
});
});
});
Playwright Sensibilities
There is only one style in Playwright; it doesn’t contain any framework-specific knowledge. If you’re familiar with writing JavaScript, you’ll understand it quickly.
Native JavaScript promises form the foundation of Playwright, which allows us to wait for the result of any async operation and store it in a variable. This style of programming aligns with how we write code daily:
As developers, we want the ideas in our heads to flow freely into our IDEs (or terminals, if you’re a psychopath), with as little friction as possible. Framework-specific knowledge comes at a cost. If you aren’t writing Cypress tests every day, you’ll need to refresh your memory each time you need to write a test. Continuity between your tests and code means moving between the two is effortless.
Developer Experience
Playwright has great support inside VS Code. Want to step through your test code with breakpoints? You’ve got it. You just fixed a test and want to test it to see if it works. Rerun it directly from inside your IDE with a click of a button. It’s smooth, easy, and a treat to use.
Speed
Playwright’s performance was the feature that initially caught our attention. We planned to stay with Cypress and rework our foundation (moving our stack into Docker containers). Out of interest, we looked at which testing framework the industry used, and there was a consensus that Playwright was the new “it girl”.
We started with our longest-running Cypress test (creating one of each of our Canarytokens), which took around 5 minutes to execute with Cypress using Chrome only.
Migrating the identical test to Playwright, it now takes 1 minute and 30 seconds to complete, running against Chrome, Firefox, and Webkit. For a developer, few things are as gratifying as watching performance numbers drop—it’s like pressure-washing a grime-caked driveway.
How is Playwright so much faster? Playwright runs each test in a separate browser context (essentially an incognito window). It interacts with the browser contexts by means of the DevTools protocol for Chromium and custom protocols for Firefox and Webkit. Because tests are isolated, Playwright can run multiple tests simultaneously. Cypress runs tests in-process, meaning the tests run inside the browser in the same execution context as the app you are testing. Cypress can only run a single test simultaneously; parallelism requires using Cypress Cloud.
All adds up
Ensuring your team doesn’t wallow in Cypress code, trying to remember framework-specific gotchas, or waiting three hours for the test suite to finish means your team can focus on writing useful test cases.
One of our team members pointed out that our CI test report artifact was 700mb, and downloading it from GH took 30 minutes. We could have shrugged it off, but we took half an hour to investigate whether we could change the tracing to only include failed test data. We could. It’s a tiny thing, but had we left it, we might never have gotten around to it, and a 30-minute wait would have become the norm.
Concise code makes it easier to understand a test’s flow. Respecting your developers’ time means they’ll have more time to do the important stuff. Having a system people enjoy makes pushing through tough patches easier.
Fight the Flake and knowing your systems
It’s easy to ignore that one flaky test. “It only fails every other time, it’s fine.” Eventually, as you add more and more tests, you’ll find yourself in a situation with 20 flaky tests. Twenty flaky tests distracting your developers every time they fail.
We set a zero-flaky-test policy. Whenever we completed our tests, we’d have to run the suite with –repeat-each=50, which reran the new tests 50 times. If they failed once, we’d need to figure out why and fix it.
Running the tests repeatedly might seem harsh, but it meant that these tests would be as solid as a Nokia 3310. It also forced us to get to know Playwright, our testing infrastructure, and our UI.
Initially, running tests concurrently would lead to loads of inconsistent failures. As the frontend team, we could have left this and chalked it up to flakiness, but we had a no-flakiness policy. We had to figure out why this was happening. Debug web server startup scripts aren’t built for concurrency. Our production Consoles use Nginx and uWSGI to facilitate our frontend communication with our backend. So, we aligned our test setup with our production services. No more flaky test failures; as a bonus, our tests ran even faster.
This increase in speed also allowed us to find a race condition that occurred while deleting a Flock, which would break the UI on page load. This bug had been present for years. We could have ignored it but that damn “no flakiness” policy! *shakes fist*
While building our user management test suite, we noticed the tests took longer and longer to run each time they were repeated (--repeat-each=50). Every time we deleted a user, every other admin user would get an email mentioning that somebody had removed a user. This growing list of emails would start interfering with the test timings, and tests would fail. The compounding delay could mean a user might wait 10 seconds for an API request to return. Also a bug that was present for a while, and we wouldn’t have found this if we had ignored it.
These things might seem unimportant for standard test runs (that don’t repeat), but as you add more tests, the flakiness will start to add up. Squash the bugs when you find them so you can return to the important stuff.
Make sure you’re testing the important stuff
Our transition between Cypress and Playwright wasn’t just a straight port. We also wanted to write new test cases that completely covered core feature functionality. We started with the five most important features our customers use.
For us, we’re all about letting customers Know. When it matters. For the tests, this meant focusing on alert management and testing our most popular Canary configuration flows to ensure folks could get those alerts. Alerting and setting up Canaries are the most critical aspects of our interface. Customers spend their time in these areas, and we want them to be bug-free.
In our Cypress test suite, we had little to no focus on what was or wasn’t an important test. For example, we had a test to assert that the text on our 404 page was correct. Now, by itself, that test is okay, but why would you write a test for that when the Cypress suite has no alert management tests, our company’s primary focus?
We set a plan by focusing on the critical stuff and ruthlessly avoided busy work.
What’s a good test?
A great test behaves as a user would. It should mimic the actions a real person performs. Making sure the elements are visible isn’t enough. For example, suppose the feature is a configuration wizard to set up a device. In that case, the test should step through the entire wizard, fill in forms and tick checkboxes, and then complete the wizard with an assertion to confirm the device settings have changed. The tests should cover all permutations of the wizard, looking for bugs in every nook and cranny.
Paul wrote a suite of tests for our Windows File Share service, one of our most popular Canary services.
Users can tailor their file share through the UI by adding, removing, renaming, or uploading custom files. An optional feature also generates a file structure automatically. Here’s an overview of the feature from a recent webinar:
There’s a lot of moving parts. Here’s what we tested:
Turning the service on and off
Validate user input
Turning System Shares on and off
Turning alerting on and off on Authentication attempts
Enabling and disabling of a File Share Instance
Adding a new File Share Instance
Validate user input for a File Share Instance
Creating a new folder in the file tree
Editing a folder name
Deleting a folder
Adding all of our [7] basic file types (.docx, pdf files)
Turning on and off Industry Specific Shares (our feature that generates the share based on your industry)
Selecting an industry generates a new share
Adding miscellaneous departments to the new share
Regenerating the Industry Specific Share
Custom upload file size limit validation
These tests ensure that our Windows File Share works as expected, even when we’re not around. It’s important to note that we’re testing features as if we were a user. We’re testing actual functionality and not just ensuring the word “Windows File Share” appears in the DOM. Anyone making changes to this feature in the future can rest assured that we’ve got their back.
Writing tests like this is hard work, and ensuring they aren’t flaky is also hard. The thing with writing good tests upfront is that they become the blueprint for all the following tests. Solid tests provide value every time your CI runs. They hold the shape of your product and ensure you aren’t letting your customers down.
How Close did we get to our ideal test system
In the end, we got pretty close. We’ve had 20 failure alerts in 148 commits (around 2 months of work) to main.
A handful of these were due to an upstream bug, which we’ve worked around by installing the latest Docker Compose.
A few of them were due to legitimate bugs we introduced; whoop, whoop!
Some were due to flaky tests that managed to sneak past our --repeat-each=50 rule. We put these tests on pause while we looked at their implementation. We needed to overhaul a few of these tests before re-enabling them. We decided to leave the more stubborn tests disabled because we concluded that the value they added wasn’t worth the effort. Remember, only focus on the important stuff! Low-value tests that distract your developers aren’t worth it!
As of writing this, we wrote 311 rock solid test cases across our main feature set:
Alerting and Alert Management
Canary Configuration
Canarytoken Configuration
User management
Authentication
We’ve got an excellent foundation for building even better tooling in the future.
Tear Down
One of our core principals at Thinkst is that we are a refuge from mediocrity. It’s difficult to do something well, it takes work. We put in the work. If something isn’t where we want it to be, we iterate until it gets there.
We have always known that there was coolness to find in fixing our test pipeline, but we were always busy doing more important work.
If someone had asked me a few months ago whether our Windows File Share feature worked, I wouldn’t have known unless I manually checked. Now, I know it works. If it didn’t, our test suite would have notified me.
Make time for your team to explore things like this. You’ll find a lot of great stuff here, and it might be a force multiplier for your team. You might build something you can’t imagine doing without.
[ This is a lightly edited internal post we’ve made public.]
Last week we had booths at DevConf Joburg, and DevConf Cape Town. They’re two ZA events run by the same crew with the same speakers, two days and 1400kms apart. The organisers set a bar in ZA for putting on polished and well-run events. Where the average event is in an old venue with limited food and chaotic organisation, DevConf is punctual, classy, and efficient.
Francois & Victor (Jhb), and Leighton & Daniel (Cpt) joined me in the two events, and we spent the time demo’ing Canary, and talking about Thinkst. We don’t expect to make sales from DevConf; the audience isn’t security, and they almost universally aren’t buyers. Any sales we get are bonuses. The reason we sponsor is not because we’re spendthrifts either. Through the year we get requests to sponsor events, podcasts, publications, software, education, meetups, do co-branding, write (or accept) guest blog posts, and more. We usually decline. For DevConf, our participation stands on two legs: supporting a developer community, and introducing (and maintaining) a public presence for future hiring. We do that mainly through 1-on-1 conversations with folks who walk up to the booth and, typically, start with “So, what does Thinkst Canary do?”.
One conversation I had in Cape Town stuck with me, and in this post I’ll reflect on it a little more. Late on Thursday afternoon, a gentleman came up to the booth with a friend. He introduced himself and (approximately) said, “Last year we chatted, and you spoke about Caring for the product. It was unexpected to hear, and I’ve been thinking about it since. I hadn’t heard about caring for the things I build. Can you tell me about how you care about the product?”. We then proceeded to have a solid chat about what it means for us in practise, and he went away happy, knowing more about our approach.1
I’m not writing here to be self-congratulatory about it,2 it strikes me there’s a deeper revelation lurking. The gentleman wasn’t a fresh graduate, he seemed to have some miles behind him. And he’s got this far in his career without hearing about deeply caring for the thing he builds. It’s not just him; I frequently hear similar sentiments when we interview folks.
What strikes me is how utterly fragile it is, to care about the thing we build. The standard incentives push towards getting junk out; whether it be investors demanding press releases with new features matching the latest hype cycle, or Support wanting to close tickets without digging into the customer’s real issue so as to reduce queue sizes, or logistics and back office folks skipping mails due to distraction, or developers mashing quick fixes over deeper problems knowing that “it’ll be someone else’s problem next time”. It’s so fragile, there are developers who can’t imagine caring about what they build, not because they don’t want to, but because they never encountered the idea. That’s deeply troubling.
Caring about software is like the (in)famous inverted pendulum. Imagine balancing a glass on a stick; you have to constantly keep moving to keep the glass balanced, because the system is inherently unstable and requires active feedback and input to keep the glass in the air. Maintaining care requires the same control loop: feedback on where we’re diverging from our ideal state, and counteracting the movement with action to push us back into the caring state. Tiny things perturb the system: individual people joining or leaving, people going on (or returning from) leave, rearranging reporting lines, software releases, supports tasks and tickets, large orders, small orders, customers in new geographic locations, and any number seemingly inconsequential actions.
Last week, we interviewed an experienced engineer with deep background in very technical work, and he never interacts with customers in his current role. Not “seldom”. Never. He has no direct feedback from them whether what he does solves their problems. He builds a feature according to a ticket, ships it, and doesn’t know whether anyone uses it. It’s hard to care about what you build in that instance (and it shows; when asked to articulate an example of building something delightful, he struggled.)
Our teams have done well in keeping the care evident in how we build, support, and maintain Canary. But that’s no guarantee about the next week, month, or year. So this is a reminder that caring about the thing we build isn’t the stable state, and that we have to constantly fight off the wolves of mediocrity, howling at the gate.
This picture is the only AI-generated content in this piece: I asked ChatGPT several times to “make the wolves even more mediocre”, and this is the result. Apparently mediocre wolves are, well, dogs.
At Thinkst, we build tools to make attackers’ lives harder and defenders’ lives easier. Our latest Canarytoken does exactly that—introducing the SAML IdP App Canarytoken (already available on canarytokens.org, but now available on customer Consoles too!)
Where our Fake App Canarytokens for iOS and Android detect badness at the device level, SAML IdP App Canarytokens help at the identity level. Organisations rely on Single Sign-On (SSO) to manage authentication across their cloud applications. Attackers know this and target identity providers (IdPs) as a high-value entry point into enterprise environments.
By setting up a fake SSO app in your IdP dashboard, you create a high-fidelity tripwire. If an attacker stumbles upon the app and attempts to access it, you immediately receive an alert identifying the compromised account. Early warning of identity compromise helps you react before an attacker can escalate privileges or move laterally within your environment.
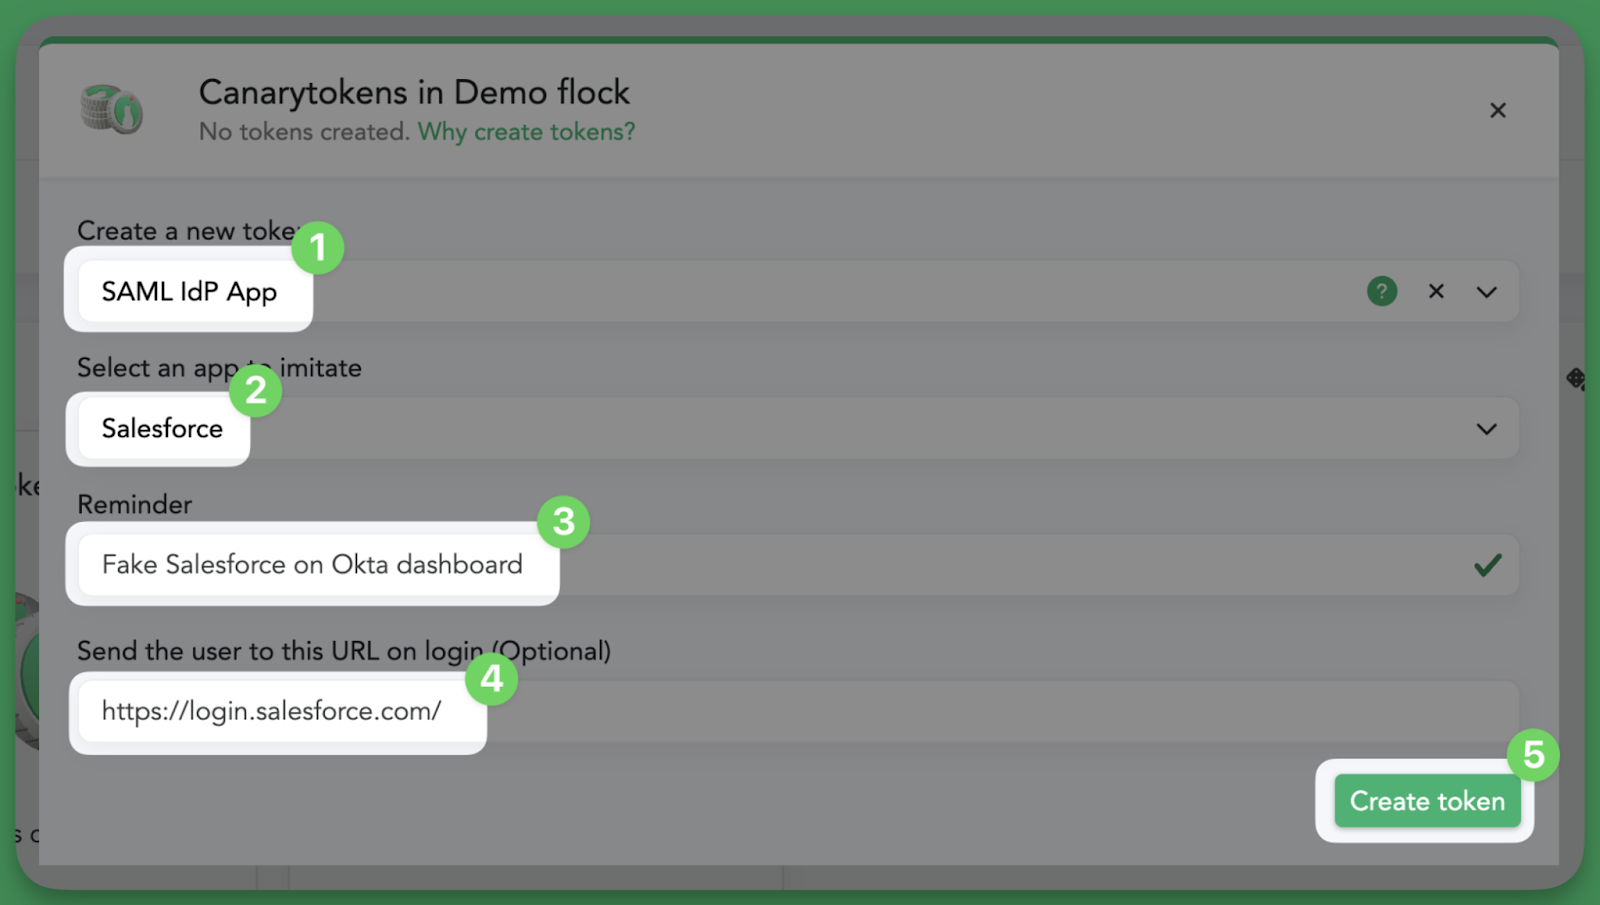
Creating a SAML IdP App Canarytoken
Create a Canarytoken (either on your Console or canarytokens.org) by choosing ‘SAML IdP App’ from the Canarytokens list.
Select an app to impersonate from the dropdown. Leave a reasonable comment to remind yourself where you will deploy the Canarytoken (e.g. ‘Fake Salesforce app on Okta’). If you want the app to redirect to a specific URL, enter it in the ‘Send the user to this URL on login (Optional)’ box.
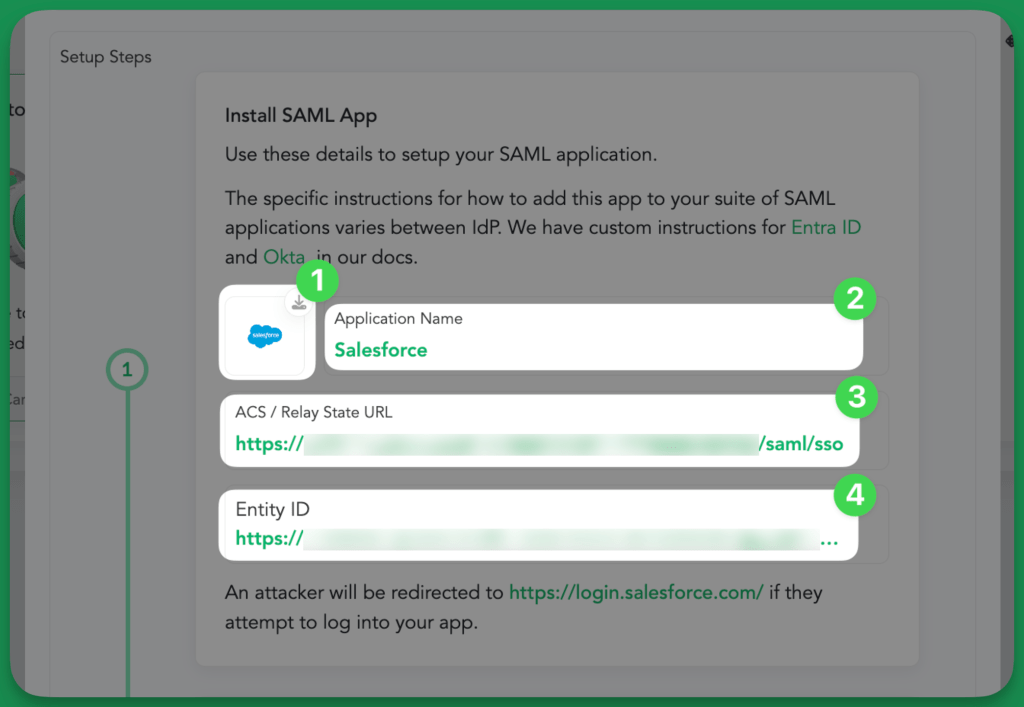
Tap the ‘Create Canarytoken’ button. Download the app icon to use on your dashboard, and use the ACS URL and Entity ID to create a SAML app in your IdP.
Assign it to users and/or make it discoverable. Your token is now set up, and will blend in seamlessly with other apps in your organisation!
Validation
Unique to the Console version of this token is the ability to enable SAML request validation by uploading the SAML metadata file generated by your IdP after creating the App. With it we can cryptographically validate incoming SAML requests and only alert on legitimate login attempts, adding an extra layer of fidelity to the signal that a user on your IdP has been compromised.
Conclusion
Attackers thrive in silence—Canarytokens break that silence when it matters. In the age of cloud platforms and SSO dashboards, the attack surface is distributed, and a robust defense requires spotting attackers where they are. This Canarytoken catches a very specific case (identity compromise), and we think it can form a valuable part of defenders’ arsenal.
A counterintuitive truth is that great products are defined by both the features they include, as well as those they don’t. We spend a lot of time pondering potential new features for Thinkst Canary to make sure the added value exceeds the inevitable cognitive complexity that new features (or new UX elements) bring. This post will dive into a recent Labs research effort that we ended up leaving on the cutting room floor.
Background
We are always on the lookout for attacker techniques that can be repurposed for defense. A likely candidate emerged when skimming the recent CISA red team reports (1, 2): Abusing Unconstrained Kerberos Delegation in Active Directory networks.
Active Directory (AD) allows for ease of use through single-sign-on (SSO). A user who’s logged into their workstation can navigate internal file-shares, web applications, and databases without having a separate user account to manage (or another password to remember). The user’s machine works with the AD domain controller (DC) and either presents an authentication hash, or, preferably, uses the Kerberos protocol to mutually authenticate to a server. SSO with Kerberos simplifies the user interaction, and prevents a host of hijacking or adversary-in-the-middle attacks, since both the client and server are authenticated.
Kerberos delegation comes into play when one server wants to access resources on behalf of the end user. An example from Microsoft’s documentation is an intranet web application that renders data from an SQL database. Access control is simplified when the web application can only see files that the end-user has permissions to. Legacy configurations of AD initially supported this with a concept called “Unconstrained Delegation”. A server with this permission can act on behalf of any user authenticated to it, to any other resource in the network.
This is as dangerous as it sounds.
If the application has been subverted, it can then “be” any user who’s connected to it, including Domain Administrators. For this reason, Microsoft has introduced constrained variants of delegation in which the delegation is limited to only certain resources or services. These settings, including Unconstrained Delegation are a property in a Computer’s object that is editable inside the AD Users and Computers tooling:
Naive first stab
Attackers know Unconstrained Delegation is a desirable target, and there are many tools1 that look for (and exploit) it. Our [naive] first idea was to manually set this property on a Canary’s machine account in AD in order to attract the attention of tools that scan for Unconstrained Delegation. This would point attackers towards the Canary–profit!. Since Canary is a honeypot that doesn’t store real data or credentials, we reasoned that it would be manageable from a risk perspective.
Unfortunately, that’s not true in this case.
An attacker would now have additional targets: the Canary’s AD object and the machine password the Canary uses to authenticate to the DC. If the Canary’s AD object has Unconstrained Delegation set, anyone with the Canary’s machine password can act as the Canary within the AD and leverage the Unconstrained Delegation privileges. In other words, the Canary’s machine password would give attackers a powerful step-up towards Domain Admin.
The machine password exists on the Canary itself (this is integral to the concept of being domain-joined) and this means that Canary would now hold a valuable secret. This is contrary to one of our central design goals: not storing valuable data on the Canary–there should be nothing an attacker will gain by compromising a bird.
Under the naive approach (and without special permissions), if the attacker had the Canary password (or ownership over its AD object), they could create AD object attributes that direct clients towards their system2. The attacker could then induce a DC to connect to them, allowing them to impersonate the DC’s machine account–granting full administrator privileges. This attack sequence is detailed beautifully by Dirk-jan, but in short, (if we followed this approach) by controlling a Canary, its machine AD object, or the user that created it (or can take over ownership of it), an attacker gains a high-confidence path to Domain Admin.
At this point, we had built a firmer understanding of the attack space (and how dangerous Kerberos Delegation is–even Microsoft Defender alerts on it now), but couldn’t countenance putting our Canary users in such a risky spot. We were about to move on when we had another thought…
Attempt number two
In our initial reading, we came across a great blog by Crowe, where they lay out the risks of Unconstrained Delegation. What if we could create a machine object in AD with Unconstrained Delegation that doesn’t actually have a backing machine–in short a kind of Ghost Server? Then we could use the attack setup steps from the Crowe blog to point attackers looking for the Ghost Server to seamlessly connect to a Canary. This approach has a few benefits over our initial (naive) approach:
We can ensure that the Ghost Server object is owned by a Domain Admin, and the ACLs on the object prevent any other groups or users from modifying its object attributes. Since the Canary doesn’t have any changes to its AD object, it remains as banal an attack target as before.
There is no domain-joined machine that can be compromised to recover the machine account password from. It only exists on the DC. Since this machine account is never used, there won’t be copies of its credentials in-memory on any system other than the DC.
The Ghost Server will pop up when any attackers are looking for machines with Unconstrained Delegation, but the attackers will actually be connecting to a Canary.
Enumeration via Impacket in GOAD lab
In order to execute this deception, we created the Ghost Server object, and pointed its DNS at a Canary. As expected, the Ghost Server pops up as a juicy target for attackers, but any attackers are then pointed to the Canary. This was close to perfect, however, Kerberos authentication would fail as the DC would issue a ticket for the Ghost Server, and since Kerberos is a mutual authentication protocol, the Canary couldn’t pretend to be the Ghost without having access to its valuable secret.
To bypass this limitation, we had to dig deeper into Service Principal Names, or SPNs. SPNs are like DC-internal records for the Kerberos service to map a service name (e.g., ghost-server.domain.local) to a machine account (e.g., ghost-server). Even though we had changed the DNS records, the Kerberos service on the DC would issue a ticket for the non-existent machine. Somewhat counter-intuitively, if we removed all of the SPNs (using AD’s setSPN.exe) from the Ghost Server’s machine account, and added the Ghost Server’s domain names to the Canary’s account in the SPN records, it worked!
As shown in the figure, when an attacker looks for machines with Unconstrained Delegation, the AD object for the Ghost Server is returned. When the attacker’s machine tries to connect to the Ghost Server, the DNS directs it to the Canary. Then, when the attacker’s machine asks the DC for a Kerberos session with the Ghost Server, the DC helps initiate a secure connection with the Canary’s machine account.
So, we now have a nifty approach that puts up a bright flag for attackers, but just as they charge towards it, we pull it away and in its place there’s… a Canary. This perfectly embodies our Canary mindset of Valuable, not Vulnerable. The Ghost Server appears to be a valuable attack target, but since the Ghost Server doesn’t actually exist, it’s not vulnerable.
But, it still doesn’t make the cut…
Why we didn’t get the W
In short: this feature would be a win for many of our customers, but adds risk to some, and differentiating between those two requires nuance. For many networks, the careful addition of the Ghost Server object will add no more risk, but there certainly will be networks where it would. Environments with complex and transitive group inheritance, or AD networks that change over time (such as during an M&A integration) could result in more users having control over the Ghost Server’s object–thus opening the aperture for malicious privilege escalation.
We firmly believe that everyone should deploy Canaries, and they will add value without adding defender cognitive load. The Canary deployment process and console interactions are designed to reduce as much friction as possible to get birds out into the wild where they can alert on badness. The frictionless process we strive for is at odds with the slower, deep analysis needed to determine if the Ghost Server approach could safely work in a specific environment3.
Do it Yourself (if you’re careful!)
Just because it doesn’t make a great Canary feature doesn’t mean it’s worthless. The technique can be effectively used if the blue-team is circumspect with its use. For that reason we’re releasing this post and an open-source script to:
Create a Ghost Server AD object (though we suggest not naming it Ghost Server 😛)
Configure the Ghost Server’s AD object to support Unconstrained Delegation and restrict its ACLs to writable only by Domain Admins
Point the Ghost Server’s DNS at an IP or machine (CNAME) of your choosing (i.e., the domain-joined honeypot–we recommend Canary 👍)
Add SPN records for the Ghost Server and associated network services to the machine account of the honeypot
To see this in action, we first run this script with Domain Admin permissions:
Then, when an attacker enumerates machines with unconstrained delegation, they find GhostServer, if they were to scan that domain (or its IP), they find the Canary’s services:
If they browse to that server in Explorer, they see files from the Canary, even though the hostname in the location bar is the Ghost Server:
Finally, if the attacker tries to open one of these files, the defender gets an alert!
It’s important to treat the Ghost Server machine account as any other Domain Admin or DC account. Monitor it for changes, and ensure when any organizational changes are made to AD that the account ownership doesn’t get inherited by other OUs or groups. This technique can help Canaries stand out to attackers, but with the caveats that if that account is compromised, there is a path to Domain Admin. (It is also worth noting that a very savvy attacker could become suspicious of the DNS/SPN records and avoid the honeypot because of it). Consider your own environment and take some time to weigh the risks and rewards. If nothing else, the spelunking was worth it.
Conclusion
Deciding what to leave out of a product is sometimes as valuable as deciding what to add in. This blog post aimed to reveal a bit of the behind-the-scenes on how we looked at a potential deception capability, almost wrote it off too early, then came up with a neat, almost-good-enough solution. As we’ve highlighted in the past, making something too easy to click through (or copy-and-paste) can overly-influence users who are rushing to complete their tasks. Considering this, we feel that this feature has too much potential downside risk to enable by default. It’s cute, and useful, but remains an activity best left for blue-teamers with ample time and resources to weigh deploying.
DNS records point clients to the server, Service Principal Names (SPNs) help the DC set up the authentication between AD users and services. ↩︎
Tools like BloodHound are great for defenders to get an attacker view of their network, and help make sure the Ghost Server object isn’t mutable by any surprising users. ↩︎
Our credit card Canarytokens are out of beta and flying to your consoles!
Create a [Canarytoken] credit card;
Store it somewhere safe;
If it’s ever used, we will let you know that “bad things have happened”.
We love these tokens because they provide a novel way to alert on a strong signal of badness. They also perfectly embody our concept of conspicuous deception. Conspicuous deception is our take that simply knowing that a credit card could be a Canarytoken adds risk to the process of stealing, selling, testing, and committing fraud on all cards. Now, fraudsters have to worry that testing or using a stolen card might be an immediate tip off.
Read on for step-by-step instructions for creating your first credit card token and suggestions for where to deploy them. For the really curious, we offer a behind the scenes look at how we got from last year’s beta to today’s launch.
Creating the new credit card token
We are slowly enabling these on Canary.tools consoles, if you are eager to try it, reach out to Thinkst Support and we’ll ensure we hit your console early. Once enabled, the new token will show up in the regular spot, along with the remaining issuable quota. Read on for step-by-step instructions for creating a credit card token.
Once you select the Credit Card token, you’ll see the remaining quota on your console. Be sure to put in a good reminder (usually where you will place the card):
After clicking “Create token”, you’ll see the details, which you can easily copy or download:
Now that the token is created, let’s issue a test transaction against it to make sure everything is working.
Once you click “Test Credit Card”, a payment dialog will appear, if you click the “Pay $100.00” button a legit transaction will be attempted using your new card.
We will let you know the status of the transaction as the vendor.
You should also hear the “pop” of a new alert!
Clicking on the alert provides some more information about the transaction: amount, date, and merchant. Use this feature to ensure that your team is ready to respond to a real alert.
That’s all there is to it! If you click off the modal dialogue, you can always return to the token details from the Canarytokens menu box.
Where to put ‘em
Every environment is different, so prescribing a generic use case is tough. If you make good use of the memo-field (“Placed in root drive of DB-Server”) and make sure you place them in unique locations, a single alert can be all the help you need to pin-point a breach.
Most organizations shouldn’t be storing payment information (and instead tokenizing it through their payment provider), but there are exceptions. If your organization is storing customer payment information, mix in these token cards–remember you can make up any name or billing address.
Alternatively, putting the token card information in an internal email can act as an alert on email compromise. There are tools like PANhunt that search filesystems and PST files (Outlook mailboxes) for payment card details which can help act as a clear indicator of network breach.
Another deployment strategy is adding it to travel information on a fileshare, as a way to detect malicious insiders. At a previous employer, our corporate card details were all in shared Word documents to allow for the travel team to book travel while keeping Accounting happy.
Stepping back
The idea behind the credit card token was to be able to give users a unique credit card number, they could put that somewhere in their environment. If a transaction was ever attempted, the card would be declined, and it would alert the token creator of the attempt–allowing the user to quickly catch network breaches. This token should give a really strong signal of badness with no false positives in the event of a real attack. No pentester should be trying card numbers, so the token can really provide a very clear signal of a real attack.
Last year we released the Canarytoken as a limited beta. Demand was far greater than we expected, causing our service provider to implement rate limits on new credit card generation. Very quickly many Canarytoken.org users were getting errors, and even with our behind-the-scenes fixes, we kept running into limits.
Even though we issued thousands of cards, we ended up deciding to pull new token generation until we could figure out a better solution. (All previously-issued beta tokens will continue to alert–the most important thing for us is to make sure users get that alert when it matters).
We knew if we wanted to match the demand for this token, we’d have to find a new provider.
The majority of the time since releasing the beta token has been spent communicating with financial institutions and fintech platforms to see if they could support our unique use case. These businesses make their money through swipe fees. Swipe fees are a percentage of each transaction that the merchant pays to accept cards. They are divided by the: card issuer, issuing bank, and any other party involved with the issuance of the card. There is a reason that every time you shop at a large store chain or fly you are plied with offers of that company’s branded card–they get a small percentage of each transaction.
When we approached most platforms, we heard the same story: the token model doesn’t fit into their business models. We would issue large numbers of cards, and have $0 of spend. The issuing platforms bear a small cost for each card issued, but would be in on the swipe fees, allowing them to recoup those initial expenses. Our proposition to never give them a path toward the green wasn’t well-received, especially because these tokens would likely have more fraudulent transactions than average. With the beta tokens, there were many instances where a user would receive a credit card number and try to spend money on it, or register for services. Even though these were declined, there can be costs and risks associated with this unpredictable behavior.
Finally, we found a provider that was willing to build a custom pricing model for our tokens: AirWallex. AirWallex was willing to issue our tokens (for a fee per card) knowing that they will not make any revenue from swipe fees. They have a mature API, and are multinational, allowing us to (potentially in the future) offer tokens with multiple countries of origin and BIN ranges.
Another benefit of AirWallex is that their API also allows for notifications of cards being tested that trigger 3D Secure (3DS), a 2FA scheme that texts or emails a code to the cardholder before approving a transaction. Without this added visibility, a transaction attempt that ran into 3DS and then never proceeded would time out, not generating a full transaction attempt and corresponding alert.
Now that we had a provider, it was time to get to work.
Making it rain
With a more reliable financial card platform, work got underway to implement the new token type into customer consoles. We still think that offering the tokens freely on Canarytokens.org helps with conspicuous deception. However, our paying customers are more likely to have real payment information stored in their environments that would benefit greatly from having early warning of compromise. Additionally, as those organizations often have closer relationships with their own banking partners, they have existing channels to quickly put fraud protections in place for co-resident cards.
This token type has a few distinctions from our existing offerings, namely that:
It costs us real money per token we provide
The token cards expire over time
The unnecessary alerts can strain Airwallex’s ability to onboard us with new BIN ranges.
We’ve offered unlimited tokens for all of our token types, generally their infrastructure and associated costs are loosely related to the volume of tokens issued or the number of alerts–for this token it’s directly related to volume of tokens issued. For this reason we are providing each console with a quota of tokens available to be issued. If you need more, reach out to us and we can bump up that quota for you.
If you require an extreme number of them (e.g., deploying tokens to each physical location), we’ll work with you to find out how best to provide this unique capability.
As we all know from having real payment cards, they expire over time. Our existing tokens generally last without maintenance, so this is a shift where there is a bit less “forget about them” and a bit more “set a reminder in a couple of years”. After the cards expire, they will be declined due to an out-of-date error, and the transaction data will not be passed to AirWallex (and then us) for alerting. As tokens are approaching their expiration date, you’ll get a reminder to issue a new one.
While AirWallex has built a cost model for our highly irregular usage, there are reputational risks associated with a higher-than-average decline rate. As these token cards will never have a successful transaction in their lifetime, excessive transaction attempts on the cards cause them headaches.
To mitigate some of these concerns, we built a tiny testing feature for your newly-minted credit card token. From the console you can issue a test transaction through the platform to testalerting, SIEM integrations, etc. without harming provider risk calculations.
While we are providing our customers with these tokens, we are not doing so for them to charge money against them. With the beta tokens, there was no way to make sure they worked without actually attempting a transaction. In some jurisdictions, this could be considered attempted fraud (or make for a very awkward trip to the nearby store), so we’d rather leave that to the criminals–just use our testing feature.
Conclusion
We’re thrilled that the credit card Canarytoken is out of beta and will be arriving at a Canary Console near you soon! Like other tokens, these are designed to be simple to deploy and alert when it matters. We are bringing the token back to the Canarytokens.org site as well, with per-day rate limits. Keep hitting refresh over there if you’re not a customer–while you wait you can check out some of our other great tokens!
We think that our deception approach wins either way: loud/clumsy attackers trip over our Canaries or Canarytokens and get caught, while savvy attackers are forced to move slowly and fail to accomplish all of their goals out of fear of getting caught. For the credit card token, we see this same pattern: a loud attacker will attempt to use the card, cause an alert, and the customer can quickly prevent additional fraud (and know their network was breached). A more clever attacker may keep stealthy, but only by giving up the value from the stolen cards.
We hope you will find these as exciting as we do, enjoy!